Hi, Thanks for visiting my website. My name is Will and if you have questions
or would like to
contribute projects or ideas you can contact me
How to Make a Karambit
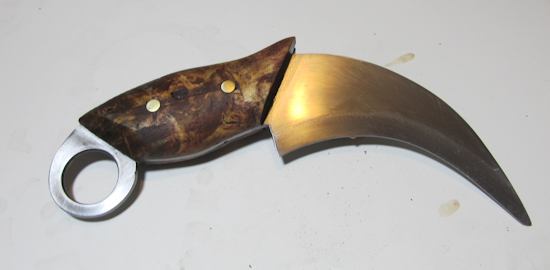
This is a fun and interesting little blacksmithing project. It is an ancient Indonesian knife called the Karambit. It dates back to around the 11th century and you can do this project without an anvil. I use the stock removal method to make this neat little knife. I also have more about the Karambit here.
I also have a video tutorial on this project. It is at the bottom of this page.
The Karambit is a particularly effective knife for self defense and it has a whole school and system of use. You can see that it is not a stabbing weapon but a slashing weapon. And, this one is sharpened only on the inner edge of the blade. That is how most of them are. But, sometimes they are sharpened on the outer edge too.
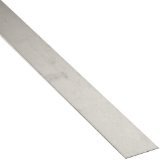
This is the exact steel that I use for this project. Sometimes it goes out of stock, but returns quickly. You can order the same width and thickness in a different length. Or you can go a bit thinner and get the 1/8 inch thick. Still great.
Materials Needed:
1 piece of O1 steel - at least 3 1/2 inches wide and 10 inches long. about 1/8 inch thick.
1 piece of hardwood for the handle (here is some burl wood you can look through: Burl wood for knives
1 length of 1/4 brass rod, can get it at home depot or lowes, any hardware store. You will need about 3 inches
1 length of 1/4 wooden dowel, this is temporary rod
Mineral spirits to clean everything (optional but nice)
Various emory paper, 100, 220, 320, 400, 600. approximates are ok
Gorilla Glue two part epoxy, 5 minute set time is ok
Tung oil to polish the handle
Minwax stain _ only if you want to stain your handle
Drill bits: 1/8, 1/4 and a stepper drill that goes at least up to 1 inch.
Plus:
A lot of this stuff is interchangeable, go with what you have
Hacksaw
Belt Sander
1 inch belt sander
Dremel tool with grinding bits
Coping saw or jewelers saw for small and curved cuts (optional)
A few mill files , only mill files for the blade and handle
A Rasping file to shape the handle
Various sand papers
OVERVIEW OF THE PROCESS
Make a trial knife out of cardboard and turn this into a template
Use the template to cut your steel and your wood handle
Cut the steel and the handle to shape, and bevel the steel
Harden and temper the steel
Glue the wood handle to the steel
Polish it all up with tung oil and emory paper
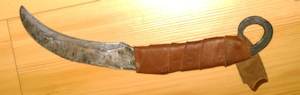
Can you make this karambit? You sure can . Here is one made by Olve. He wrapped it in leather and tells us a bit about making it: My name is Olve, Im a Norwegian viking reenactor. After I saw your tutorial, I decided to try making my own karambit. I dont have that many cutting tools, so I did it all in the forge. My karambit is a lot bigger. I didnt expect it to get this big, but it doesnt really matter. Most knives come in all different kinds of sizes.
If you are using my template you can print it up and cut out the pieces. There is a blade and two handle pieces. If you are designing your own knife you should do some drawings. Get something you like and that you think will be comfortable in your hand.
From that you can make a prototype out of cardboard or foamboard. This is optional but a really good thing to do. When I made my prototype I discovered a few things that needed changing. You can use this to really hold the knife in your hand and see how it feels and how it fits in your hand.
Once you have your final design you are ready to start on the knife. Cut out the blade shape and glue it down to your piece of steel. Keeping it close to the edges of the steel is great. It saves hacksawing.
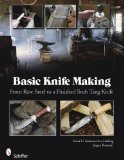
Ernst G. Siebeneicher-Hellwig has written several books about knifemaking.Jürgen Rosinski is a blacksmith and former vocational schoolteacher. He teaches knifemaking to both beginning and advanced students.
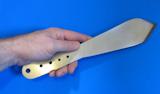
Make a Throwing Knife
Yes, a real throwing knife. This is a fun project to make and a fun project to use! I had a lot of fun with this. All you need is a piece of steel and some basic tools. And you don't need a forge. You can harden and temper this with a torch. Make a Throwing Knife
What is a Karambit? Why is the Karambit one of the most awesome personal defense weapons of the Indonesian Archipelago? Extracted from the jungles of West Java, deep in the heart of Indonesia, the ancient technologies of the Karambit masters are revealed for the first time in this unique contribution to the world of martial arts edged weapons training. In this "how to" training reference, delve into the rich history and practical operation of this incredible artifact. Uncover the secrets of the Indonesian training method, combative strategies, and the way of the ancient masters in edged weapon defensive tactics such as disarms, takedowns, throws, immobilizations, escapes, locks and other self-defense skills in operating the Karambit. The history of this ancient and mysterious weapon is steeped in legend and its operation until now has been kept secret for centuries. Join Jagabaya Steve Tarani as he takes you step by step through the mystical history and training drills of this highly guarded close quarters personal defense system. This outstanding volume is a must for the serious student of edged weapons, martial arts training and self-defense application.
Do you like making projects and exploring a variety of hobbies?
Sign up for my free newsletter. I give you regular updates on hobbies and projects you can make. it is totally free and I don't share your email with anybody.


 Can you make this karambit? You sure can . Here is one made by Olve. He wrapped it in leather and tells us a bit about making it: My name is Olve, Im a Norwegian viking reenactor. After I saw your tutorial, I decided to try making my own karambit. I dont have that many cutting tools, so I did it all in the forge. My karambit is a lot bigger. I didnt expect it to get this big, but it doesnt really matter. Most knives come in all different kinds of sizes.
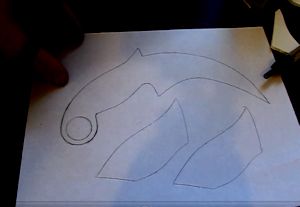 If you are using my template you can print it up and cut out the pieces. There is a blade and two handle pieces. If you are designing your own knife you should do some drawings. Get something you like and that you think will be comfortable in your hand.
  From that you can make a prototype out of cardboard or foamboard. This is optional but a really good thing to do. When I made my prototype I discovered a few things that needed changing. You can use this to really hold the knife in your hand and see how it feels and how it fits in your hand.
  Once you have your final design you are ready to start on the knife. Cut out the blade shape and glue it down to your piece of steel. Keeping it close to the edges of the steel is great. It saves hacksawing.