
![]()
I have a youtube channel with over 700 Videos!
![]()
![]()
![]()

Tutorials
- Military Diorama Home
- How to Make Plastic Models, tips, tricks and techniques
- Home page for other types of dioramas
- History of Dioramas
- How to Make a Military diorama - step-by step tutorial
- Diorama Books
- Diorama Ideas
- Diorama Examples
- Diorama Making supplies & Tools
- Diorama Making Videos
- Diorama words, terms and definitions
- Waterfalls and water in dioramas
- Plastic Model Builds
- Scale of Military Models
Time periods
- WWI Dioramas
- WWII Dioramas
- Vietnam Dioramas
- Water Dioramas
- War Gaming Dioramas
- Medieval Dioramas
- Airplane and Jets
- Other, Spartan, ancient, etc.
Fast Tutorials
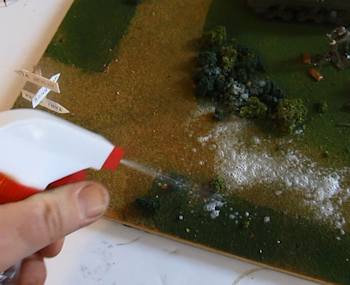
- Salting technique on plastic models
- Pencil shavings into terrain textures
- Use Plexiglas to make bodies of water
- How to make bricks
- Make Water Effects
- How to make a waterfall
- How to make snow for your diorama
- Diorama Trees
- How to make trenches
- Terrain making with foamcoat
- Make Military tarps, canvas and canopies
- Creative terrain shell making
- How to make Miniature Trees
- How to Make rubber rock and wall molds
- Motorize a drawbridge on your diorama
- Using foam to make a diorama
- How to make good looking rubble using cork
- WW2 diorama trench making tips with video
- How to make barbed wire
- How to make mud in a diorama
- Painting Miniatures
- Painting Miniature American Soldiers (1/72 Scale)
- How to make plastic models: Tips, Tricks and techniques
- Painting Miniature German Soldiers (1/72 Scale)
- How to make plastic models- Tips tricks and techniques
- How to Paint Plastic Soldiers
- Diorama Tip - plastic models and resins
- Diorama Tip - Using Plastic Putty for seams and cracks
Dioramas by Web Visitors
Buy Stuff
- Airfix Model Kits
- Revell Model Kits
- Tamiya Military Model Kits
- Woodland Scenics Turf and Terrain Materials
- Italeri
- Dragon Models
- More Plastic Model Makers
- Books
Plastic Models
- Apache Attack Helicopter
- Huey Helicopter
- Walker Bulldog Tank
- Battleship
- Duckboat DUKW
- P51 Mustang
- German Submarine U boat
- A-10 Warthog
- Douglas TBD Devastator
- Aircraft Carrier
- Sherman Tank 1/72 Scale
- Tiger Tank 1/72 Scale
- German FlakPanzer
- Plastic Models
- Model Airplane Kits
Tools/Supplies
- Woodland Scenics Terrain Materials
- Woodland Scenics Turf and terrain Materials
- Diorama Making Books
- Model Making Tools and Supplies
- Diorama Kits
- Scene-A-Rama diorama Kits
- Diorama Foam
- Woodland Scenics Grand Valley
- Woodland Scenics rolled Grass
- Diorama Accessories
- Check out the Diorama and Miniature store
- Press/Media kit

- Support Will with Patreon or PayPal

Hi, Thanks for visiting my website. My name is Will and if you have questions
or would like to
contribute projects or ideas you can contact me