I Began work on bringing back the original Edmund pedestal equatorial mount. I think the equatorial section was part of a prototype of some sorts as the gray color of the declination section was different than that for the right ascension axis. But that's a guess.
I purchased this about 1976 well after they manufactured and sold the six inch scope. But they may have had this laying around in the back shop and decided to get rid of it but putting it out in the store. It never made it that far. When I saw the store manager lug it out I stopped him and we bartered right then and there. I was hoping for a good price but would have paid almost anything short of the real cost. It's been too long to accurately recall what I paid for it but something inside says about $25!!! What a steal and getting a piece of Edmund history. 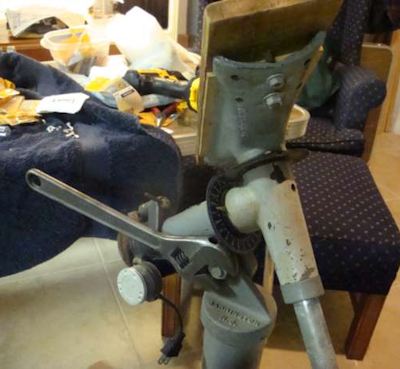
Sometime ago I modified the cradle adding a wooden board so I could attach the scope without
using the bolts directly attached to the tube preventing me from rotating the tube. But
something significant happened in my life about 1980 when I left teaching in Southern New
Jersey and took a position out near Chicago working for Commonwealth Edison in their nuclear
program.
Eventually moving there meant the mount went with but it sat dormant till the present
time. I built an 8” reflector about 1976-8 and had the very heavy equatorial for it. That was a
monster. The school I taught at had purchased the new Edmund 8” scope with all the bells and
whistles. A couple of guys, the previous astronomy teacher, and an industrial arts guy built an
observatory adding a permanent pipe mount cemented into the concrete foundation. They kept
the scope of the equatorial since it was rather bulky.
Unfortunately the observatory sat in an
open field which was broken into and the scope was stolen. With that experience the team
decided to purchase a Celestron 8” Cassegrain scope which was brand new at the time making
the original equatorial surplus hence it became my treasure. I managed to bring that mount to my
home but due to its bulk had to leave it outside unprotected where it rusted badly. Anyway I
had hoped to mount the 8” on the 6” pedestal even knowing it might have been under rated for
the task. Its portability was the driving issue for me. This all happened when the Dobesonian
mounts was gaining some popularity but I hadn’t gotten the world about that design at that time.
So a later project will be to make a Dobson mount for the 8” scope and leave the 6” pedestal
mount dedicated to the 6” scope! Sorry for the detour, but back to the current restoration work.
I decided to work on the pedestal section sans the equatorial which is why you see the large
crescent wrench locked onto the attachment nut.
The Edmund’s
I’m writing this up as the work gets done so it might jump around some. While working alone in
the shop and basement I have time to think and the Edmund’s came to mind again. It was a long
time ago and it takes some to bring it back. I remember both Mr. & Mrs. being in the store. It
was after all a family business. I don’t know if he served during the war but he somehow found
himself with an opportunity with the government downsizing all the military hardware it
acquired, stockpiled and in some cases had shipped back from wherever. He was likely
struggling like most guys were in the 50s so he started his surplus optics business working out of
his home that was way before the original store manufacturing plant was built in Barrington.
I
can almost remember the name of the road but not quite …but I can clearly see it and them in my
mind’s eye. I think the property the house sat on was adjacent to the store which made sense.
They were both thin and rather formal from my memory but not stuck up. He was much
friendlier than she but that was the early 50s and proper women were never familiar as she was
a classy lady.
Obviously I saw him out and about on my visits to the store which to me was
better than visits to the ice cream parlor or candy store. He’d help if asked but was open to letting
a 14 year-old kid roam around and around dreaming. When I was teaching at Deptford High
where I graduated from in ’65 I was about 24 years old. Money was tight so an opportunity to
make a few extra bucks was appreciated but to work at Edmund’s well, I’d almost work there for free it meant so much to me (But don’t tell anyone at Edmund’s I said that!).
By that time you
didn’t see much of Mr. Edmund’s and I can’t recall seeing his wife again. The scope business was
probably pretty soft but the disco era was upon us and it came in with a bang. Somehow they
latched onto that phenomenon with the advent of light shows. Edmunds had all kinds of thin
front surface mirrors; they found thin rubber membrane material and stretched that over large
bass speakers. The mirrors were affixed to the stretched membrane which vibrated like heck
when loud disco music was played. They created a light studio to showcase the things they
made. I fell in love with the Moody Blues-Knights in White Satin that still plays in my head.
Lasers were then available having their research lab quirkiness overcome. At that time
Edmund’s sold lasers with their label on them. I don’t think they made them, likely an
outsourcing arrangement but I really don’t know. The place was jumping. Crazy folks would
come down the NJ Turnpike, get off Exit 3 near Barrington and bring tons of money to buy all
the light show toys. I sold a ton of that stuff…probably 10 times more than the telescopes that
still sat out on the showroom floor. I enjoyed selling scopes and techie things but the light show
folks paid the bills and my paycheck! Edmund’s hired several high school teachers as part-time
weekend sales people. We were good with folks. Knew enough science to fit and worked cheap!
What a combo, a win-win for both the company and the few hungry teachers.
I was there about three years when for some reason I left..no wasn’t fired but life was changing
perhaps workload. I moved from Deptford Twp HS to Washington Twp, now the largest school
district in South Jersey and the very best! Soon they made me chairman, now chairperson for the
merged math-science departments. The first step required the base to be cleaned. I used the garden hose and a stiff brush to knock off all the dirt, dust and grime from the parts. Then I hand sanded each after disassembling to remove as much lite rust and contamination on the surface prior to spray painting. I used a new textured spray paint with a gray base color to change up the appearance from being sprayed with the traditional battle ship gray. This is the type of paint suggested to be used to repaint outdoor furniture. I don’t know
how it will hold up but I do like the 3-D texturing affect you see here.
I used stainless steel ¼ x 20 bolts with wing nuts to reattach instead of the brass hardware I installed so
long ago. The bumping of the legs with the bolts when I removed and re-installed them for transport
dinged up the soft threads making it harder and harder to simply do the breakdowns and assembly
tasks in the field. Gee back in the 70s Home Depot and Lowe’s didn’t exist and getting local access to
stainless steel nuts and bolts wasn’t a possibility. Remember this all predates the pc and World Wide
Web we now take for granted. Gee back in the “dark ages!” How did we survive and get anything
done?
At this stage I thinking of making a new cradle based on Doug Strobel design found on his Meet
Smurfette web site. I want the tube to be able to rotate to improve the
experience I have observing at the eyepiece. Searching for professionally cast tube rings showed it
would cost approximately $250 for just the rings, so making my own became the option I pursued
even though it added weight to the mount over that from using aluminum. I already tried using
stainless steel hose clamps but didn’t like having to fiddle with a screw driver to release and attach the
scope from the mount, not to mention all the scratches on the tube.
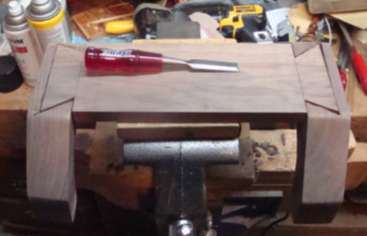
Well the idea was to make this cradle shown here but I had several big slabs of beautiful black walnut
that begged being part of the new 6” scope. It could easily have held a …well you name the diameter.
I made a template based on my best guesses at Doug’s cradle. I decided I was going to do some 18th
century cabinetmaking and cut hidden dovetails into each cradle.
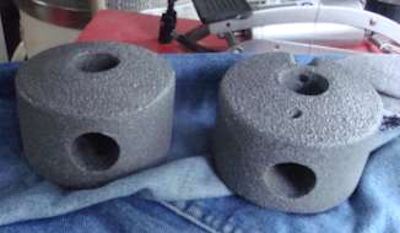
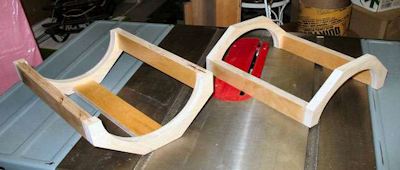
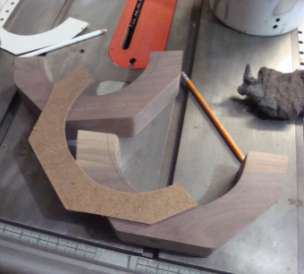
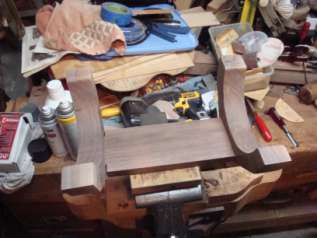
When I finished making the rough cut lower cradle, I realized oh I have two more to make. After what
I experienced on top of everything else I’m doing I sat back and thought a minute which lead to the
decision to use them for the lower half. The first image shows my bandsaw cuts while the second
shows the sanded parts. I was in for a surprise when I tried to lay the 7” tube in the cradle on my table
saw!
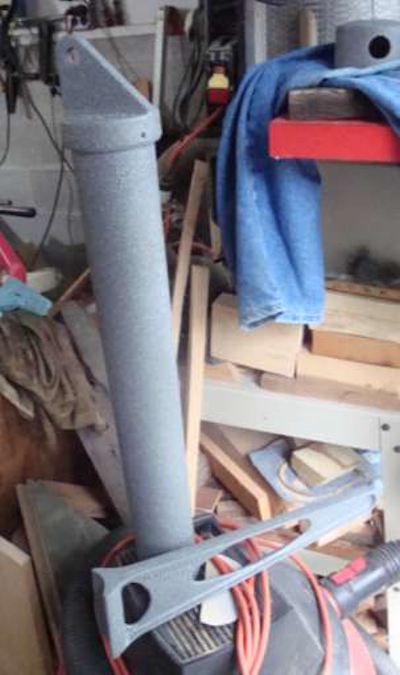
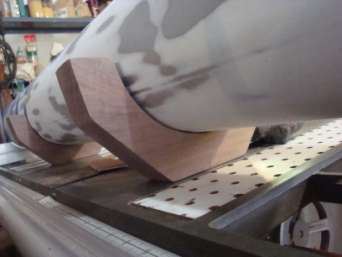
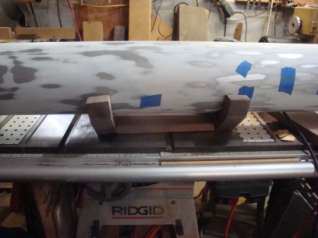
The first principle of woodworking is measure twice cut once….well I’ve been driving to get further
along and am getting a little punch drunk. Luckily as you can see the tube in the first image sits
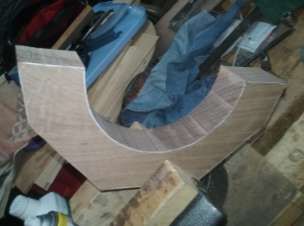
high and there’s plenty of wood. I didn’t bother to figure out what I did, I just went in and using the
outer dimensions of the white template seen in the upper left edge of the second image. I decided
to use the tube’s outer perimeter rather than measure and use a compass. I found a thin piece of
Masonite and used it. I trace the tube’s edge and tried it against the tube….a perfect fit. But I knew I
wanted some felt to line the bed to lower friction when rotating the tube in the field, so I hand traced a
larger diameter freehand. So there’s a gap to allow me to glue felt into the bed at a later time.
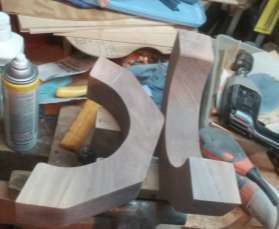
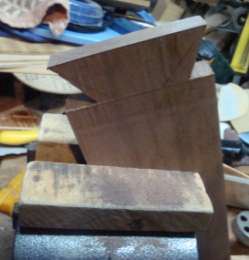
The pretty part which took several hours was to cut in blind dovetails on both ends. I made the
straight piece using another thinner piece of walnut and by eye decided what I needed to do. I offset
the dovetail ½” off the very end of the yokes so the tenon would be invisible when the mount work
was completed. I cut the wedge ends into the flat board and used it as a template to trace around the
bottom of the yokes. The hard part was cutting out all this walnut using chisels and a mallet. I used a
back saw to make the trapezoid, (I can’t remember its formal name). You can see the trial fit with the
yokes just standing on the table saw.
Like 18th century joiners, I used a backsaw to cut the diagonal edges. They over cut the right and left
triangle edge but cut just a smidge off the pencil line. It’s under cut and then hand fitted so the final
fine chisel cuts are carefully made walking the piece into its locking frame. These joints were used to
assemble drawer sides and were not seen by the critical viewer. So over cutting made the work go
faster where time was money back then too.
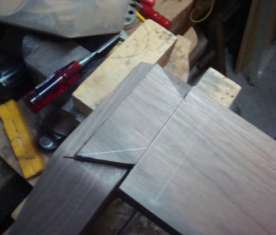
No they don’t fit perfectly but they don’t have to. I don’t make these very often, in fact almost never.
The first cut out took forever but the second one was cut out much faster. I wasn’t as afraid and had
learned the best ways to use the chisel including sharpening it several times.
The joints were then glued and clamped on one end, the first one…yes the first one is the hardest and
your worst; the second fit like a glove and was done much faster as I said. That’s how it goes in the
real world. Perfect was not my goal I’m not figuring the mirror. This side will never be seen as it’s
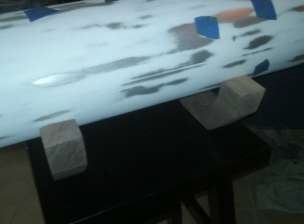
the underside. I will add a couple of brass wood screws on both ends to add some additional security.
In real life I wear a belt with my suspenders! The image below shows the upper or proper side before
gluing.
The rest of the afternoon was spent working on the 4” mount. It’s repetitious in it needed cleaning,
sanding and painting. I took the mount apart, a task not yet done on the 6” mount and cleaned up the
fittings and the two axes. These and the mount itself were painted using the same sand color outdoor
lawn furniture spray I used on the 6”.
Edmund used the same pedestal for both the 6” and 4-1/4” scopes. You can see there wasn’t much beef
put into the right ascension and declination axes. But the mirror is much lighter as is the tube so it
worked very well for me years ago. Now being more discriminating I may have a different opinion after
it’s assembled and field tested. But it’s going to my neighbor for him and his kids as a starter scope. It
will be hundreds of times better than the children’s first refractors made by Meade, etc.

Let's continue with the telescope restoration
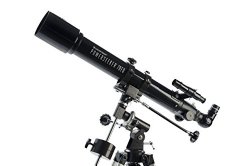
Celestron 21037 PowerSeeker 70EQ Telescope
70mm (2.8") diameter refractor, 700mm focal length (f/10), German equatorial mount with RA and DEC slow-motion controls and setting circles, 5x24 finderscope, 20mm eyepiece (35x) - 1-1/4", 4mm eyepiece (175x) - 1-1/4", erect image diagonal - 1-1/4", Barlow lens 3x - 1-1/4", adjustable aluminum tripod with accessory tray, "The Sky Level 1" CD-ROM. Metallic charcoal black tube color.
|