SUBJECTS

Science Fiction
Fantasy
Classical Guitar
Movie Reviews
Little Wonders
Astronomy
Art & Drawing
For Writers
For Webmasters
The Meaning of Life--

THINGS

Essays & Stories
Serendipity Engine
Webmaster linkswap
Beyond Harry Potter
The Penny Quest

STORES

Posters
Dioramas and miniatures

BLOGS

TSFTMOL
Misguided Brilliance
Essays

MORE

Links
Banner Exchange

---------
All Materials, unless otherwise stated are Copyright©
Kalif Publishing and StormtheCastle.com

If you have questions
or would like to
contribute you can

---------

Earning money with your website

Babes of science fiction & fantasy

Storm The Castle.com
Return to Home Page    
Making an Invisible Man: Page 4
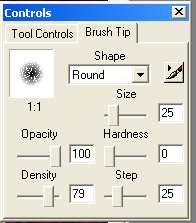
The most difficult part of this exercise is learning how to use the clone tool properly. Here is the properties box for the clone tool.
   

All of the Different properties in this property box are very important. You should experiment with them all to see what kind of control it gives you over the clone tool.

The Shape Property: You can assign the clone tool a different shape. It's like changing the actual shape of a paintbrush.

The size property: This changes the size of your paintbrush. Generally to do the large areas that don't need a lot of detail you use a large brush. This allows you to quickly paint in the general areas. Then as you work down toward the detail you adjust this property for a smaller brush.

The opacity Property: This allows you to set a see thru variable. If this is set at 100 then none of the background will show through. If you set this less than 100 as you are painting over with your new color you will still see some of the background..I used 100 for most of this exercise. But when I was almost done I painted over some of it at an opacity of 50. This blended the wall pattern very well. Gave it a more continuous and smooth transition.

The Density Property: This sets how much "Paint" is put on the photo as you brush. 100 is the thickest paint.

Experiment with all the settings in the property box. You will get some really good looking effects.

This is the end of the tutorial