|
||||||||||||
|
|
Reality Factory Make a video game tutorial: Lesson 14 Adding a Pool of Water continued
About Water in your Game There are two different concepts to know when it comes to adding water to your game. Do you want the water to be passable? In other words will the characters be able to walk and swim in it? Also, do you want it to be transparent? Can the player look into the water and see the bottom of the pool? The answer for us is yes to both these questions and this will be the typical answer in most of the water you make. But just be aware that you can make the water, or other liquid such as lava, not passable so it can be walked on. And you can make it opaque so it can't be seen through. This idea of transparent is also important if you want to put fish tanks in your game. Let's add a new brush to the game. This is will be the cube of water in the pool. Hit the Modify templates button Now in the left side of your screen in the control panel you see a pull down menu under the heading of entities.. Pull down this menu and select "liquid" And a new cube shows up in the game. If a cube doesn't show up then just pull down the Tools menu and select New Brush | Cube Now in the right side tools panel make sure you select Customize Template and check the button for solid. This should be already set to solid because the last brush you made was solid but check it for practice. Now, Using the Scale Brush and the Move Brush get this new square to fit nicely into the pool. Remember to use the camera button to move your views around so it is comfortable to work on. You can zoom in and work on it so it is nice and easy. Now that you have it the right shape hit the textures tab on the left, find the dark texture for a muddy water look hit the select button then on the right side of the screen hit the "Add to World" button and your new water block appears. Make the Water Passable It has some of the characteristics of water but we are not done. Single click on your new block and its edges turn green and the Brush attributes box comes up on the right of the screen. Make these selections: Under Type check the Empty button and under contents check the Water box This makes your new block of water passable so when the player steps on it he actually goes into the water. Make The Water Semi Transparent
You can see that menu here. Now at the bottom of this menu there is a checkbox for Transparent. Make sure you put a check in this box. And under it the transparency value is set to a default of 255. Delete this 255 and input 175. The lower this number the more transparent the water so you may want to experiment with this number by previewing the game and then setting it. This properties box doesn't have an ok button. You just have to input the number - simple as that - and the program knows what you have done.
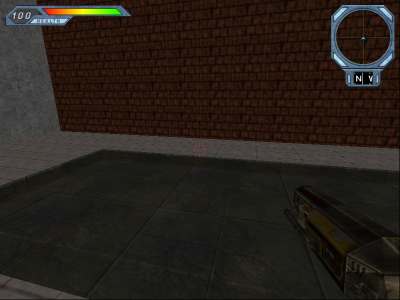
Here is my pool of water that is pretty dark but you can see the square pattern of tiles at the bottom vaguely through the transparent water. When you play the game you will step right into the water and you will hear the swishing of water as you walk. One other nice thing about water is that if you pagedown again so you are back to normal block editing and you see the Brush attributes Panel you can select the checkbox called "Wavy" and the water in the game will ripple. This is a pretty cool effect. I recommend you give it a try to see what it looks like. In the Brush Attributes control panel after changing to Wavy don't forget to hit the apply button. OK, that's enough about water for now. You have a general concept of how to do it and we will do more water effects and will do some water that looks great. For now you can do basic water, make it passable, make it semi-transparent and even make it wavy! So you have actually come a long way. For the next part of this tutorial we are going to learn how to import your own graphics right into the game so you can use them. This way you can find nice graphics and images or even make your own then use them in your game. To do this chapter we are going to get a nice blue water color imported into the game so we can do better water.
|
|||||||||||
Copyright©2001-2016 Kalif Publishing - Contact, copyright and Disclaimer - Let's Make Something T - Storm the Castle T Publishing
|
||||||||||||


 Now we want to be able to see through the water so with the block still selected and its edges green press the pagedown button on your keyboard. This scopes down to work on the faces of the box and it brings up the face attributes menu.