|
||||||||||||
|
|
How to make a video game Part Two - Placing objects in your game - We start with columns I have added some lights to this room in order to add a little bit of mystery. Remember: Lighting is very important for your game. Spend the time to learn how to do it well -and experiment. It only takes a few seconds to change the lights and run the game to see how it looks.
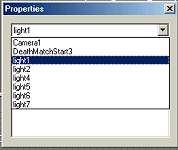
Let's Do it. I won't take you through the steps for each light but I will review for you what I did. This scene has six lights, you can see them as small x's in this picture.
Let's Review Light placement and illumination
Make a video game - Light Placement
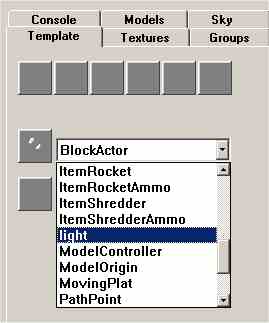
Select the template mode button In the control panel select "template" then in the menu that starts with "block actor" drop down and select "light". A light is an entity and this drop down menu is a list of entities that you can place in your game. Now click on the light bulb The light bulb is inserted into your room and created as an entity..
It shows up as a blue star in your three views and as a little light bulb
in your textured view.
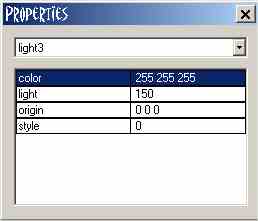
Now press the entity dialog button
You can change the Red Green Blue color values of the light. The current setting of 255, 255, 255 makes white. The light setting is currently 150 this is the brightness of the light. Double click on the field "light" and enter your desired brightness. You can experiement with this setting. The higher the number- the brighter the light and the further it will extend illumination in the room. You are doing great so far! After you have placed and adjusted your lights Save your game Now run it by pressing the compile button
Press the OK button and take a look at your illuminated room. See anything that you would change? Go back and manipulate it.
Remember that when you have a lot of entities in your room you can easily
access and manipulate them by pressing the entity dialog button
Okay, Let's take a break before we move on to the next part .Having any trouble? Your game won't run? It starts to run but it comes back to the editing screen? There are a few common mistakes that people make at this point of the process. Look these tips over and check.
|
|||||||||||
Copyright©2001-2016 Kalif Publishing - Contact, copyright and Disclaimer - Let's Make Something T - Storm the Castle T Publishing
|
||||||||||||


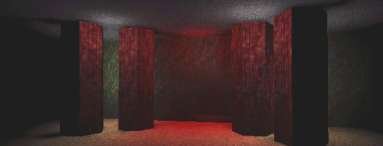 Here
is the same room as on the previous page. All I did was add some lights.
It makes a big difference in the feel and look of the game.
Here
is the same room as on the previous page. All I did was add some lights.
It makes a big difference in the feel and look of the game. 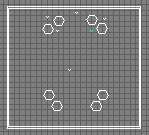
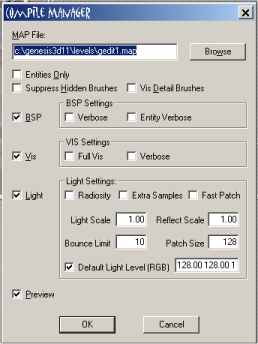 Be
sure that the Default Light Level (RGM) box is unchecked and be sure that
the preview button is checked.
Be
sure that the Default Light Level (RGM) box is unchecked and be sure that
the preview button is checked.