|
|||||||||||
|
|
Milkshape Tutorial - Lesson 3: Learning about the workspace You are already familiar with this kind of workspace. It is very similar to Genesis 3d and Reality Factory. Can you see how the whole game development world is tied together. An important thing to remember about this is that no matter what software you use you will learn some good skills that will transfer to other programs. So, if you are planning to be a professional game developer using a free or inexpensive program like Milkshape 3d will prepare you well for when you start using the very expensive professional programs. Milkshape is not as powerful as the professional programs but it teaches you the concepts of vertexes, wire frames, skinning, animation, joints and more!
Again, Here is the workspace. Let's take a closer look at the other parts of the workspace. Most of this is new to you so you won't understand what the different buttons and menu items actually do but as we build a model you will see and learn! . . . .
The big box of buttons and tabs on the right side of the screen are where you will do much of the work. There are four tabs labeled Model, Groups, Materials, and Joints. Click through these tabs and get familiar with what it all looks like. You will use this tool box a lot. In particular the Model Tab is where you will do a lot of your work. It is shown in the picture on the left here. Having worked through one of the other tutorials some of this stuff looks familiar to you like Select, Rotate, Move, Scale Cyliinder and more. . . . .
And at the top of the workspace is the familiar menu items. There are a lot of easy to understand tools here like File, Edit etc. We will go through the other items as we need them. And remember that if you get stuck you can alway look through the Help menu.
At the bottom of the workspace is a tool called the Animation Slider. This is where you can view the motions of your Character. Okay, you have a sense of what the workspace is all about. Let's start building a model.
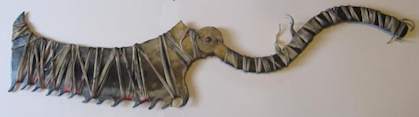
Make the Saw Cleaver from Bloodborne
This is an interesting and fairly easy project you can make with two sheets of foam board and a little paint. I give you the template! And it really works. You can open and close it! Make the Saw Cleaver from Bloodborne.
|
||||||||||
Copyright©2001-2016 Kalif Publishing - Contact, copyright and Disclaimer - Let's Make Something T - Storm the Castle T Publishing
|
|||||||||||