 |
|||||||||||
|
|
Now let's add the reflecting pool This is going to be a shallow pool and we are going to be able to step right into it but we have to watch out for leaks and we have to have a base under the pool so people can stand at the bottom of the pool. So we will add a solid object at the bottom of the pool
Now size the block and position it where you want. And make sure it is right up against the bottom of the floor so you don't have any leaks. Apply a texture to this block and make it a different texture than the floor of the temple because we are going to make the water transparent and you will be able to see the bottom of the pool.
Go to template mode, select a new brush and make it a solid brush. This is your block of water. Place it right into the hole you cut. Size it nicely then hit enter to place it.
We need to define this is water that you can walk into so select the Face/Brush attributes button
Select Empty, Wavy and Water then hit OK. This makes your water something that you can walk right into. If you don't do this then your player will walk right on top of the water.
Now we also want the water to be semi-transparent so it looks real. Hit the Pagedown button on your keyboard and we scope down into this block of water. Now hit the face/attributes button again
At the very bottom of this dialog box there is a check box for transparent, check this box then enter 100 into the transparency value. Close the dialog box. There is no okay button.
This sets the water to be transparent and now when you play the game you will be able to see the water but you will see right through it to the bottom. Now take a look at your room! If you haven't already done so go to template mode and insert a Deathmatch start entity then compile your level and with the preview box checked take a look at what you have! You have done a really amazing job by getting this far through the tutorial on how to make a video game. You might not realize it but you have developed some skills! In the next section of this tutorial we are going to do some high powered stuff and learn how to create and import your own graphics into the game. I have given you a lot to learn and there are many different little points that are tricky and maybe a bit confusing. It might be a good idea at this point to go back to the beginning of the tutorial and make a new dungeon level - just for the practice. Remember that if you are going to build a big video game you will be building dozens, if not hundreds of rooms. And each room has to get textures, lighting, doors, and maybe water and other stuff. This is a normal part of the process and even a bit of a grind. But it is what you have to do if you want to bring a full game into realization. Here is a link back to the beginning of the tutorial if you want to review Make a video game beginning of tutorial
|
||||||||||
Copyright©2001-2016 Kalif Publishing - Contact, copyright and Disclaimer - Let's Make Something T - Storm the Castle T Publishing
|
|||||||||||


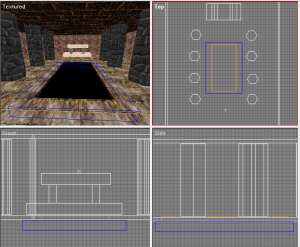 Here is my base under the reflecting pool. In Template mode pull down the Tools | New Brush | Cube and make sure that in the cube dialog box only the "solid" button is checked, uncheck the cut brush button.
  Having trouble getting your objects to line up perfectly? Check the snap to grid function. Because you have made a bunch of different shapes in different sizes they may not be in exact texel increments so you may have to turn the snap to grid option off then you can move the objects very finely and line them up exactly how you want.
 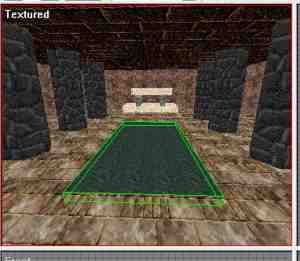 Select the textures tab in your console on the left of the screen and scroll down and find the "Water" texture and apply it to your block.
 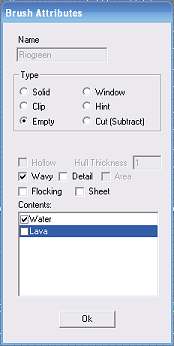 Now the face/brush attributes button dialog box comes up.