|
|||||||||||
|
|
Make a Video Game Tutorial Part Animation - Make a Sliding Door In the last lesson we learned how to make a door that hinges. In this lesson we are going to get just a bit fancy and make a door that slides. Actually this sounds kind of fancy but it is actually really easy to do. And learning this skill doesn't just apply to doors. Remember that creativity is key in game making so you should always think about other ways you could use the "sliding" technique. So let's get started making a sliding door for your video game What you are doing is creating a model (door) and then attaching an animation entity to it. Note: At this point in the tutorial you should be able to quickly create two rooms, texture them up real quick and then cut out the doorway. If you are having trouble with this you should go back to the beginning of the tutorial and practice some more. Begining of this tutorial. (Practice makes perfect) Note that if you come directly to this lesson from the previous lesson about rotating doors you might want to clear out all of your door models so you can start fresh. You do this by clicking on the models tab, pulling down the menu to any models you created then pushing the delete button.
Click on your door so it is selected (light blue) Now click on the models tab and press the add models button. Now enter the name for your door. I call mine slidingdoor1 Now let's create the entity. Click on the template tab and check the tool bar at the top of the workspace to make sure the modify brush button is pushed. In the control panel pull down the listbox and select door. Press the lightbulb button and hit enter. This creates a new entitiy for you. Now find this new entity in your view screens and drag it over to the center of your door. It doesn't have to be exactly in the center just make sure you look at it in all three views top side and front verify it is inside the door. At the top of your screen select the menu item called "entity" and then select "entity editor". Pull the drop down menu and select door1. This is the entity you just created. Double click the word "model". Select the model you created, my model is slidingdoor1 and press okay. Let's animate this now
Click your door to select it then press the animate button. Now move your door to the open position and press the end animate button. A box pops up asking you to enter key time. I entered a keytime of 2 for 2 seconds. You can adjust this to any speed you like. Want to make it move in exactly a straight line? There are buttons at the top of the screen called Restrict X, Restrict Y and Restrict Z. Pressing this button will only allow you to move the door in certain directions. I used the Restrict Z button to do this. Dont' forget to unlock the Z axis after you have completed the animation. Thats all you need to do, now you can add your deathmatchstart entity and give it a try. Want the door to slide open then slide back? That's easy: Press the animate button again, move the door back to the closed position and enter a new key time. I use a keytime of 4. This doesnt mean it takes 4 seconds to return. This means it takes 4 seconds before it finally gets back to this spot. You have 2 seconds to open then another 2 seconds to close. Want the door to pause after it opens fully. Before you move the door back you could press the animate button, press the stop animate button and enter a keytime of 2 seconds. Then you could animate, move door to close and put in a keytime of 6. If you have trouble with this stuff about models and animation you can check the help menu in genesis. Here is what it says: A model is a group of one or more brushes to which programmers can attach data, and level designers can animate or point to from entities. There are two primary reasons to create a model: to create a moveable piece of geometry that you can animate; or to create a piece of geometry that programmers can identify at program run-time in order to provide special effects when an operation involves that piece of geometry. To create a model, selecte the brushes that you want to make up the model, and then from the Models Options page, click on the Add Model button. The program will prompt you for a model name. Once you've entered the name, the program creates the model. You can add brushes to a model by selecting those brushes, selecting the desired model in the Models page, and then clicking on the "Add Brushes" button. Other buttons on the Models page allow you to select and deselect all of the brushes in a model, remove brushes from a model, delete a model, clone a model, and set the model's rotation origin. The bottom half of the Models page allows you to define an animation path for the model. You create a model's motion by defining its keyframes--points through which the model will move--and the time it should arrive at each keyframe. When animating the model, the engine interpolates between keyframes to provide smooth motion. The simplest motion is one with a single keyframe. The model will move in a straight line from its original position to that keyframe in the time that you specified when you created that keyframe. Motions with multiple keyframes work in much the same way, but the animation engine provides interpolation that moves the model smoothly from one keyframe to the next without abrubt direction changes (i.e. it "rounds the corners"). To create a motion for the model, select the desired model from the drop-down list on the Models page, and then press the Animate button. The editor will select the model's brushes and put the editor into Move mode. You can then move and rotate the model to the position you want the model to occupy at its next keyframe. When you have it at the position you want, press the Stop Animating button and enter the keyframe time.
Remember: This animation tool is really neat and there is no reason why you have to do just a door in a straight line. You could make all sorts of objects that move in all kinds of ways. And that brings us to the next part of this tutorial: Making an elevator.
|
||||||||||
Copyright©2001-2016 Kalif Publishing - Contact, copyright and Disclaimer - Let's Make Something T - Storm the Castle T Publishing
|
|||||||||||


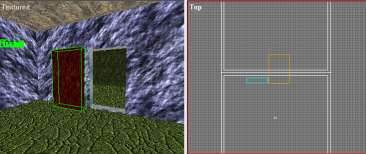
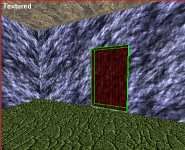 This is where you should be. You have two hollow rooms and a solid door in its closed position.