Hi, Thanks for visiting my website. My name is Will and if you have questions
or would like to
contribute projects or ideas you can contact me
Building a Stop Motion Tyrannosaurus REX!
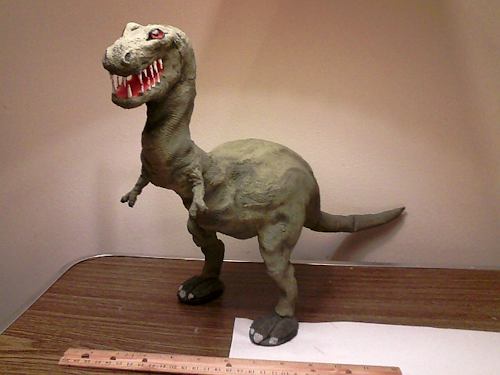
Here is a fantastic tutorial on how to make a Tyrannosaurus Rex for stop motion animation. This T-Rex and this tutorial was made by CAMO. My thanks go to him for sending all this in. His T-Rex came out absolutely amazing.
This tutorial is an extension of my tutorial on how to make a stop motion puppet. That tutorial, where I make a dragon, is here: Make a stop motion foam dragon
BUILDING A TYRANNOSAURUS REX
Here is how I built my tyrannosaurus rex stop-motion model, without breaking the bank. I started with a small flat piece of balsa wood and drew out a shape similar to a oversized guitar pic on it. Two of these were cut from the balsa sheet to form the feet. Then I cut two one inch lengths of 1" diameter wooden dowel which I glued to the feet. This dowel pieces form the ankle. Drill a hole into the top of the ankle dowels once the glue has set. It's okay if you drill through the foot, the bottom will be covered later. Now, using a epoxy glue like JB weld, glue a length of eight gauge soft aluminum wire into the hole you just drilled in the ankle. Repeat for other leg. Set leg assemblies to the side to dry.
Now cut a long length of eight gauge, soft aluminum wire. This forms the tail, spine and neck. Then cut two lengths of one inch dia. wooden dowel, one three inches long and one two inches long and drill a hole all the way through the middle of each, big enough for the wire to pass through. The larger piece of dowel forms the hip, while the smaller dowel piece forms the shoulder for the small arms at the base of the neck.. Set the dowel pieces in place on the wire with epoxy glue. Now, very carefully, drill into each end of these dowel pieces, approx. 1/4" deep. Push the leg wires into these holes on the hip and epoxy in place. For the small arms, twist two lengths of 18 gauge wire together and epoxy that into the holes on the shoulder dowel. The head is yet another piece of 1" dia. dowel rod, about three inches long. This piece will need to be cut in half lengthwise with a jig saw. The top part becomes the head and the bottom part forms the jaw. Refer to first pic for placement since it this be clearly seen.
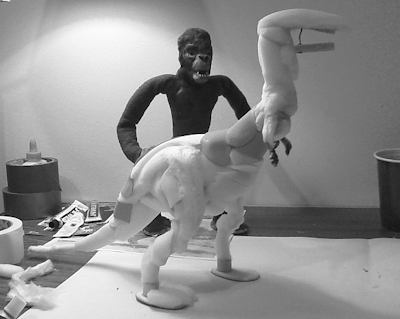
Once the epoxy has dried on the armature, glue on bits of upholstery foam with contact cement. Don't worry if you glue on a piece that is too big, it can always be trimmed down later. Keep doing this until you have a rough general shape. For facial, neck and leg muscle detail, unroll a cotton ball and pull off a small swatch of cotton. Using a brush dipped in liquid latex, simply brush the cotton onto the upholstery foam. This is great for building up around the eyes. I used glass duck eyes from a taxidermy supply. The teeth are toothpicks cut to size and glued into the mouth with contact cement.
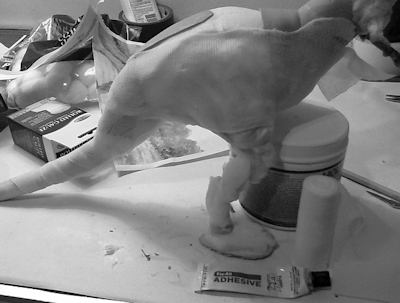
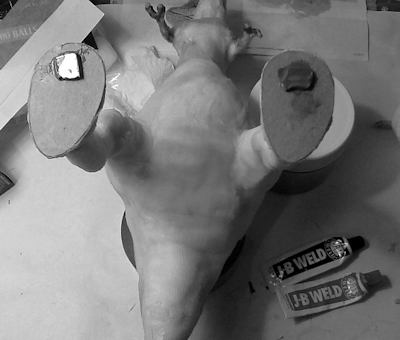
To finish the feet, cut out three toes out of foam rubber for each foot and sculpt to shape with small scissors. Glue same onto the balsa foot with contact glue. The back of the foot can be built up with cotton and latex. When dry, set the foot on a piece of shirtboard or thin cardboard and trace out the shape of the foot. Cut the shapes from the cardboard and glue onto the bottom of each foot with wood glue. This covers any holes in the bottom of the foot and gives the balsa some additional support. When dry, lay the model on its back and bend the legs so that the models feet are sticking up (see pic). Using epoxy, glue a magnet on the bottom of each foot. I used pieces of magnet I salvaged from a old hard drive, but you can buy magnets at craft stores. If you prefer a more traditional tie-down, simply glue a nut on the bottom of the foot instead of a magnet.
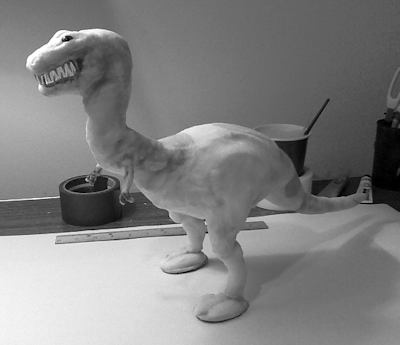
To skin the model, I applied gauze bandage, cut to shape and glued on with contact cement. Just tack it on. When you have the model covered with gauze, brush liquid latex onto the gauze. I found that only one coat was necessary because I liked the texture of the gauze. When dry, paint with acrylic paint.
To use the magnetic tie downs, place another magnet under your animation stage, beneath your models foot. The attraction should hold your model down. For a stronger hold, place a sheet of thin sheet metal down on your animation stage and stick the magnet in your models foot directly onto it.
Keep in mind there are many ways to construct animation models. Just experiment and find a method (or combination of methods) THAT WORKS FOR YOU. Remember, there is no "perfect" armature or model. These models (or "puppets") are merely tools used to create the illusion of movement via stop-motion animation. The real magic takes place between frames.
Keep animating!
CAMO created a short stop motion with this Dinosaur. Watch it right here:
MORE RESOURCES:
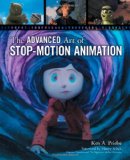
I have this book and love it. It is an advanced book.
Do you like making projects and exploring a variety of hobbies?
Sign up for my free newsletter. I give you regular updates on hobbies and projects you can make. it is totally free and I don't share your email with anybody.


 To finish the feet, cut out three toes out of foam rubber for each foot and sculpt to shape with small scissors. Glue same onto the balsa foot with contact glue. The back of the foot can be built up with cotton and latex. When dry, set the foot on a piece of shirtboard or thin cardboard and trace out the shape of the foot. Cut the shapes from the cardboard and glue onto the bottom of each foot with wood glue. This covers any holes in the bottom of the foot and gives the balsa some additional support. When dry, lay the model on its back and bend the legs so that the models feet are sticking up (see pic). Using epoxy, glue a magnet on the bottom of each foot. I used pieces of magnet I salvaged from a old hard drive, but you can buy magnets at craft stores. If you prefer a more traditional tie-down, simply glue a nut on the bottom of the foot instead of a magnet.