Here is the animation I made using this process. It is the first 21 seconds of this video. The character talks and introduces the video. You might want to watch this video to get a feel for what we are doing here.
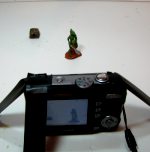
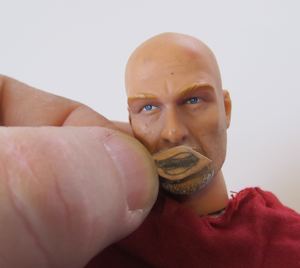
Let's take a look at the basic process. On the left you see the character we will animate. And on the right is an artificial mouth that we attach to his face. There are a whole series of mouths with different shapes. And it is just a matter of attaching them in a sequence that makes the mouth move (and roughly simulate speech) To do this I just use plain old white glue and because we are continuously changing the mouth shapes the glue doesn't actually dry. We just need the tackiness of it to hold the little mouths in place for the picture taking.

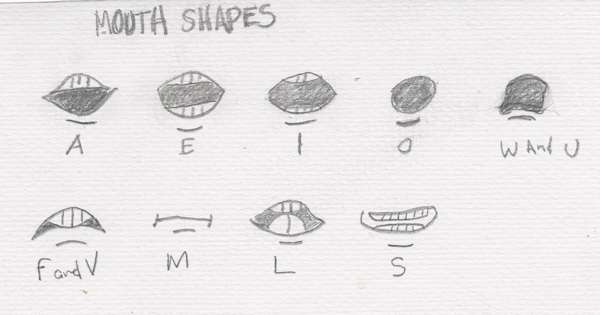
To get a reasonable facsimile of how the mouth changes during speech we make a series of drawings based on some of the more common phonemes. I did a series of drawings small enough for our figure. If you are doing an animation you can draw out these same nine basic shapes based on how the mouth moves with each sound.
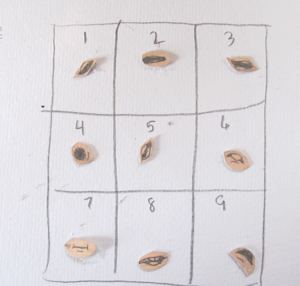
Here are the nine mouth pieces. They are cut out and placed on a grid so I can use them easily and quickly during the animation shoot.
TIMING IS EVERYTHING!
All of that is pretty simple to understand. You make a variety of mouths based on the common phonemes and then you place them on the figures mouth as they are needed and the mouth talks. But... the big thing is in the figuring out when each one goes on! That's the tricky part and that is what the brunt of this tutorial is about. How to get the timing right.
The first thing I did was actually do the voice. I figured out what I was going to say and I recorded it. By what "I" was going to say I mean the little guy. Then I imported it into a program that can print out a wave form (shown here). The program is called Audacity. This step isn't mandatory but it does make it a lot easier. Now you can pretty much see that each of these bumps is a word.
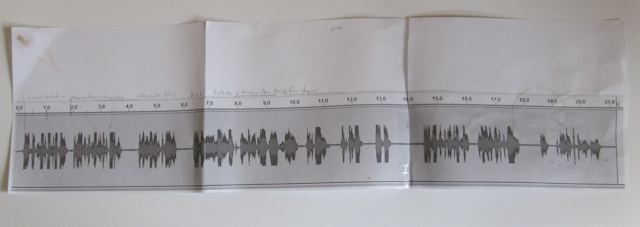
Let's take a look at the first two seconds of this narration. Now we can see about where on the time line each word is.
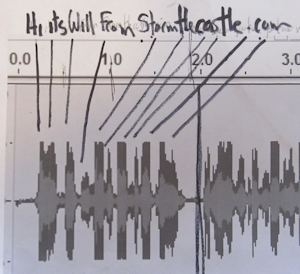
Decision Time! The only thing we have to really decide on is how many frames per second our animation will be. I have decided to make it 15 frames per second which is pretty easy to do. So, in this two second length of audio we have 30 frames.
So, think of this timelines as fifteen separate sections per second. And we can see that the first word "Hi" starts at about 4 frames into the first second. Nice! Now we know that we need to put the right mouth in at that point. And in the case of the phonemes we made it will be the "I". That will simulate "Hi" very well.
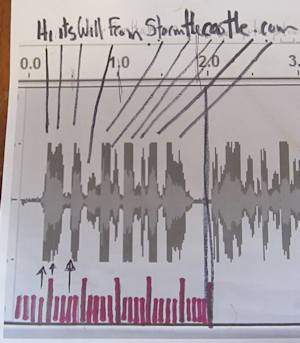
Now let's take a closer look at it! You can see the purple lines I have drawn at the bottom. There are 15 per second and that is because we are shooting at 15 frames per second. Now the first three words "Hi it's Will" Those wave forms are right about at the 4th, 5th, and 8th lines. So, that is where we places the mouths at the 4th, 5th and 8th frame.
And There is one thing you might be wondering. You should also have a resting mouth. It is a mouth that makes no sound. For that I am using the "M" sound. On my chart it is number 7.
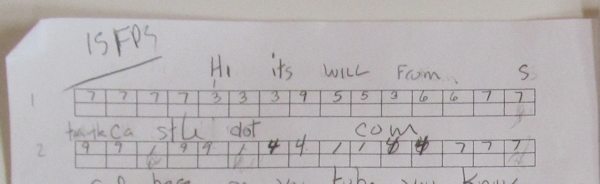
So, Let's put this all together and finish it up. All I need now is a chart of when I place each mouth on the figure. I did this by making myself a little spreadsheet. Here it is. It covers all 21 seconds of the animation and it tells me exactly which mouth to place in each frame.
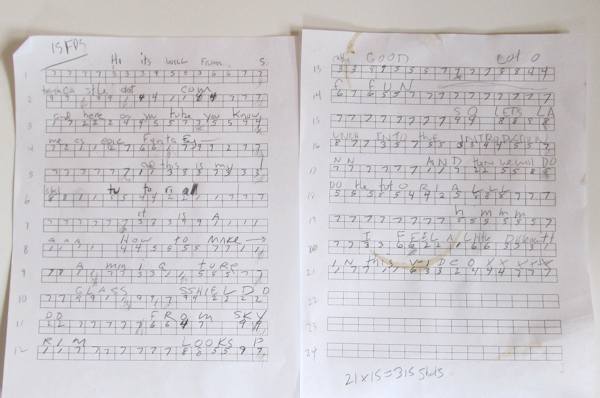
Let's take a closer look. Here is the first two seconds. Each row across is one second. And it is 15 boxes long. So, each box represents one camera shot. You can see on the first link there is a 7,7,7,7,3,3,3, 9,5,5,3,6,6,7,7. Those are the 15 mouth placements. So now it is just a matter of putting the right mouth drawing on the figure and taking the picture. I repeat this process for the whole 21 second sequence. It totals 315 pictures.
MORE TUTORIALS
If you are an absolute beginner to animation and want to know how it is done I have a tutorial here that shows you how to make one and explains all the important things you need to know. You can have your first animation done in half an hour. And you probably have software already on your computer that you can use. How to make animation
Pipe cleaners are a terrific way to make an animation. I have a complete tutorial here including everything like the set, the story and more. Pipe cleaner Stop Motion Animation