Here is the basic definition of Origami: You take a square sheet of paper and fold it into a three dimensional shape - usually some kind of recognizable form like an animal or flower. So, if you want to make origami all you need is a sheet of paper. Fold it into a shape and voila! you have made origami.
The word Origami comes from the Japanese ori meaning "folding" and kami meaning "paper".
Traditional, non traditional and newer forms of Origami
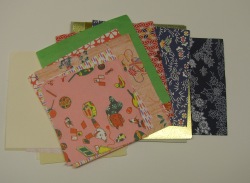
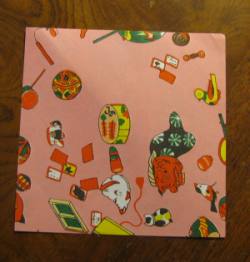
All It takes is a piece of paper - Most often a square. But this is also one of the charms of the art -the beautiful paper. You can, of course make origami with any kind of paper at all but using something with an interesting print changes it significantly. The picture at left shows some origami paper that I purchased. You can see that there are an endless variety of colors and patterns. Sometimes half the fun is getting just the right pattern for what you are going to fold.
Just like any other art or craft origami has changed over the centuries and if you want to stick to the purest form of it you it involves a bit of discipline. The most traditional rules say you have to use a square of paper. It can't be any shape other than a square. You cannot cut it and you can only do simple folds. This is the generally accepted pure form of origami although this is often debated. It does create some interesting restrictions and it does enforce discipline because you can still make amazing things and you can be proud of doing it with these rules imposed.
Okay, let's get started and make some Origami. I am going to assume you have never done this before so I will give the instructions to you step-by-step and give you pictures of every single step. We will make a pretty traditional origami swan.
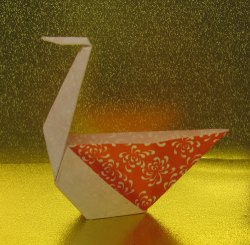
Here is a picture of the swan we will make. I use a piece of paper that is about 5 inches square. You can use just about any size that is comfortable for you. If you are really concerned about being able to make this then you should use a larger piece of paper. The larger the paper the easier it will be to work with. But typically the smaller it is the better looking it is. So after you make a large one go ahead and make some smaller ones!
 Tips from Will: Take your time with this. There is no hurry. Try to make your folds very neat and very crisp and clean. It will make a difference in the ease and in how it comes out. Match your fold lines as closely and straight as possible. AND: I also have a video tutorial that shows you how to make this Origami Swan Tips from Will: Take your time with this. There is no hurry. Try to make your folds very neat and very crisp and clean. It will make a difference in the ease and in how it comes out. Match your fold lines as closely and straight as possible. AND: I also have a video tutorial that shows you how to make this Origami Swan
And don't hesitate to use a ruler so your folds are crisp and straight.
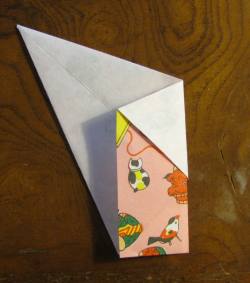
Start out with your square of paper. If it has a pattern on one side and is white on the other side I recommend you start with the pattern side up. This will make it so the swan is white but its wings are patterned or colored.

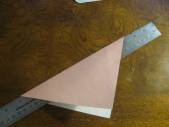
Fold it diagonally as shown in this picture. This is an important origami lesson. You are doing this fold only because you need the crease. It is a technique that is much used. So you will be unfolding it.
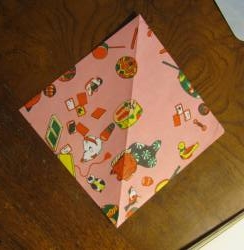
Go ahead and unfold it and lay it flat. See the crease? Orient the sheet so the fold is vertical as shown.
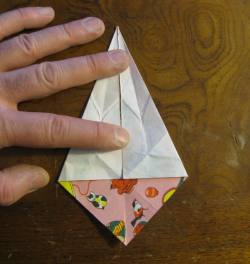
Fold in each side so it looks like the picture. Bring the edges very neatly and sharply to the center fold line. My swan here shows a bunch of extra fold lines. You can ignore these in this step. This is only because I completed folded this swan then took it apart to take pictures.
Flip the swan over.
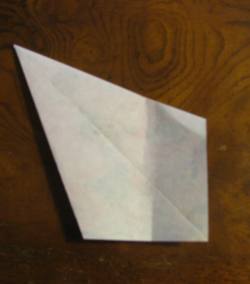
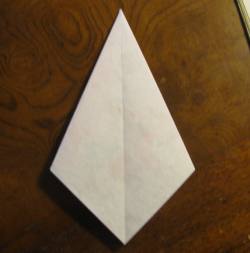
Rotate the swan so it is as shown in the picture. Just tilt it to the left so there is a flat on the bottom that is horizontal.
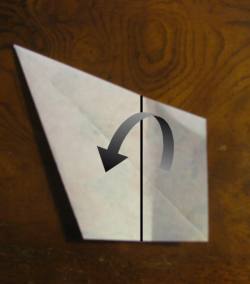
This picture shows the step you will do next. The black line shows the fold line. You grab the right side of the swan and fold it over so the bottom corners match. See the next picture for the completed fold.
This is how it looks after the fold.
 Okay, this page is getting big so let's continue on to the next page Okay, this page is getting big so let's continue on to the next page
RESOURCES
 
Origami Zoo: An Amazing Collection of Folded Paper Animals - In Origami Zoo, two of the world's finest paper folders present an exciting collection of original origami animals. Their creatures, ranging from the exotic to the familiar, the elegant to the whimsical, will both inspire the beginner and challenge the most accomplished folder.
Choose among the dolphin, penguin, swan, owl, goose, kangaroo, praying mantis, or even the mythical Pegasus or extinct wooly mammoth. Each of these thirty-seven new projects is true origami-folded from a single piece of paper with no cutting or gluing-and is complete with clear step-by-step diagrams, instructions, and a photograph of the finished model.
Origami Zoo will challenge and delight anyone with a penchant for creating something wonderful out of (almost) nothing.
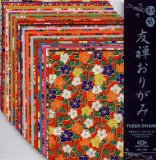 
Yuzen Chiyogami Origami Paper- Set of 30 Sheets - Yuzen Chiyogami- Set of 30 Sheets Gorgeous origami papers from Japan. These are high quality rice papers with brightly printed patterns; highlighted with metallic gold. This set includes 15 patterned sheets and 15 solid color sheets. They measure 3-15/16"x3-15/16".

Do you like making projects and exploring a variety of hobbies?
Sign up for my free newsletter. I give you regular updates on hobbies and projects you can make. it is totally free and I don't share your email with anybody.
|