Hi, Thanks for visiting my website. My name is Will and if you have questions
or would like to
contribute projects or ideas you can contact me
How to Make a Go Kart Part 2
In this section we build the actual go Kart and it shouldn't take you long. If you have wood working skills you can probably do it in 1-2 hours. If you are an amateur it might take you 3-4 hours. Remember: When building this GoKart to be safe. Use all recommended safety precautions and gear. Get an adult to supervise. And wear safety goggles!
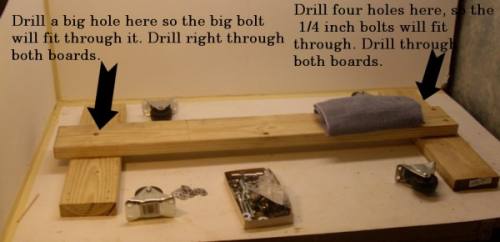
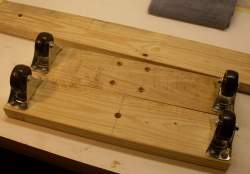
1. Cut your 2 x 6 piece of wood so you end up with one piece that is 48 inches long and you have two pieces that are each 24 inches long. Now arrange the three boards as shown in the picture and drill the holes as described.
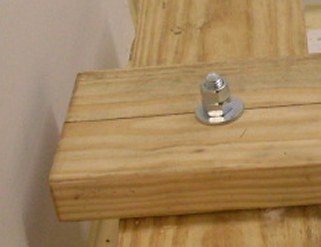
Install the big bolt in the front of the goKart. Do it this way. Insert it from the bottom with a washer betweeen it and the bottom of the bottom board. Then insert two washers between the boards then insert one washer on the top. Finally put a nut on it and tighten it so it is tight but the board still smoothly moves as you would push it with your feet. Now install a second nut and tighten it very tight against the first bolt. This allows it to stay tight without moving. With the nuts on top like this you can keep an eye on it to make sure it doesn't come loose as you ride. I also recommend you put a product called loctite on the nuts and threads. This will hold everything in place.
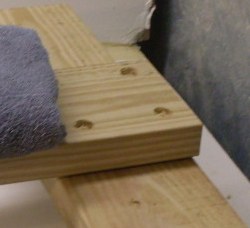
Counterbore the back holes on the top board and on the bottom side of the bottom board. This way the bolts will sit inside the wood and not stick out. Insert the 1/4 inch by 3 inch bolts through each hole and put a washer both top and bottom. No washers go between the boards. Screw these down tight and use a lock washer against the nut, and apply loctite if you have some.
Make sure this is nice and tight and there are no sharp bolt edges sticking out anywhere.
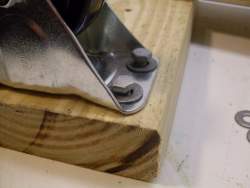
Now turn the Kart over and bolt down the wheels using the 1/4 inch by 1 inch screws. put a washer under each one. The picture shows a nice assembly tip. Do not put a screw in and tighten it. It makes it hard to get the other ones in. Put all four in and wind them down partially. Once the wheel is lined up nice and straight then tighten all four down.
Optionally, you can attach the wheels to the 24 inch boards before you attach the boards to the main board. You can see here I have everything pre-drilled and ready to assemble.
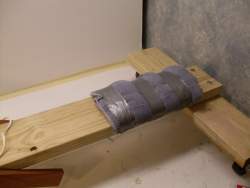
Now lets install our seat. First sit on the go Kart and see how it feels. Put your feet on the front axle and make sure your knees are bent so you can turn the Kart with your legs/feet. Now make a note of where you are sitting. This is where you mount your seat. Just put the foam, towel or other material down and tape it securely in place.
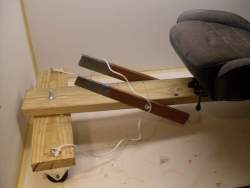
Again, sit on the Go Kart and pick up the two pieces of wood that will be used as brakes. Now place them, either inside or outside your legs, whatever is comfortable for you, and find a good location where you can reach them nicely. Mark the wood, drill a hole in the brakes and then secure them to the body of the goKart using the big 3 inch hex head screws with a washer on the outside. I drilled my hole in the brakes about 8 inches from one end. Make sure that when you pull on the brakes they actually lift the Kart off the ground. You may have to vary how you mount the brakes because of the size of your wheels.
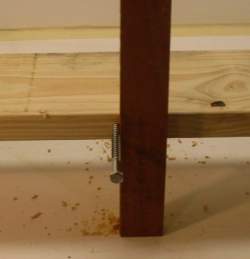
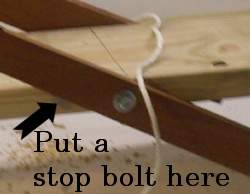
You want your brakes to lean forward like shown in the picture at left. This way they are easy to grab and they don't rub on the ground when you dont want them to. You do this by screwing a stop bolt near each brake. This is shown in the next picture.
This picture shows the stop bolt in place. These are the two left over 1 inch screws you had after screwing down the wheels.
Make sure you put lots of duct tape at the top section of the brakes so you don't get splinters when you grab them. The brakes should rest naturally on the stop and everything is perfect. They are there when you need them and do not touch the ground during normal riding.
Okay, The final step is to install the steering rope eye hooks. Tie a bowline knot in the rope so it doesn't come out and you are ready to take this baby out for a test ride. Look over everything to make sure you didn't forget anything and check all the bolts and screws to make sure they are tight.
Have Fun!
Some tips on making your Go Kart Faster and Better
You should paint it! That would make it a lot better looking. and you can get creative with the seat just like I did. Also if you want it to go faster you can lubricate the wheels or get better quality wheels. The quality of the wheel makes a difference in the speed. Bigger wheels are preferable and will give you more speed.
I have this whole tutorial in a youtube video here:
Books And More Resources on Go Kart Making
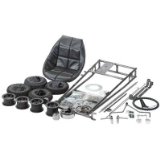
Go-Kart Kit Everything you need to construct a go-kart except the engine and clutch! Live axle set-up not found in most fun karts. Includes wheel halves, bucket seat, seat cover, chain, steering shaft and much more. Also includes detailed assembly instructions. U.S.A.