
![]()
I have a youtube channel with over 1000 Videos!
Blacksmithing
- Blacksmithing Home
- Introduction to Blacksmithing Part 1
- Introduction to Blacksmithing Part 2
- Making A Forge
- Make a Cheap Easy Forge.
- How to Make a Sword - an overview of the process
- Blacksmith Tools
- Blacksmithing Tips
- Safety Tips and Guidelilnes
- A look at the Anvil
- Blacksmithing Books
- Blacksmithing Pics
- Blacksmithing Videos
- Words and Definitions
- Knife Smithing and Knife Making
- My Articles
- My youtube videos
- Knife and Swordmaking tutorials
Blacksmithing Lessons
- 1-Introduction to the Anvil
- 1a-What is a blacksmith forge?
- 2-A quick look at forging
- 3-Drawing out Metal
- 4-Twisting and bending Metal
- 5-The 8 Basic Hammering Techniques
- 6-Hardy Tools
- 10-The Pritchel Hole
- 11-Tips from a Blacksmith
- 12-Blacksmith Tools
Forge Stuff
- Make a Forge
- Make a Cheap and easy forge
- Forges in Castles
- Home Made Forges
- The Atlas Knife Forge
- Whitlox Forges
- Make a Sword Forge
Blacksmithing Projects
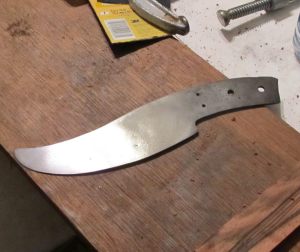
- Make a Knife
- Forging another knife
- Forge a sword
- Make a Big Sword
- Make a Subhilt Knife
- Make a dagger
- Forge a Spear
- Make Chainmail
- Make Dragonscale Chainmail
- Dinner Bell Triangle
- Pumpkin Carving Tools
- Pritchel Hole Clamp
- Make a Fullering Tool
- Make a Hammer Hatchet
- Railroad Spike Chisel
- Planishing Stake for Armor Making
- Knights Great Helm
- Railroad Spike Knife
- Railroad Spike Throwing Axe
- Make a Push Knife
- Rebar Knife
- Make a Sword in six hours
- More Blacksmithing Projects
Resources and More Stuff
- How to Get into Blacksmithing
- What steel to use for Knifemaking
- Knifemaking Templates
- Blacksmithing Books
- Blacksmithing Coal
- Blacksmithing DVD's and movies
- Blacksmith steel coloring chart
- Blacksmithing throughout the ages
- Blacksmith Products
- Blacksmith Steel
- Some do's and don'ts from a first time knifemaker
- Knives made by web visitors
- Famous Blacksmiths
- Blacksmithing Equipment
- Blacksmith Quotes
- Blacksmith Art
- The Blacksmith Poem
- Blacksmithing Prayers
- Knife making and Sword Making Videos
- Knife Blanks
- Knife Scales
- Knife Making supplies
- Where to buy an ANVIL
- Blacksmithing FAQ
- Safety Disclaimer
My other Subjects and websites
- SWORDS
- My Medieval Blog
- Medieval Website
- Medieval Projects
- Medieval Castles
- The Knight Medieval
- Catapults

- Support Will with Patreon or PayPal

Hi, Thanks for visiting my website. My name is Will and if you have questions
or would like to
contribute projects or ideas you can contact me 

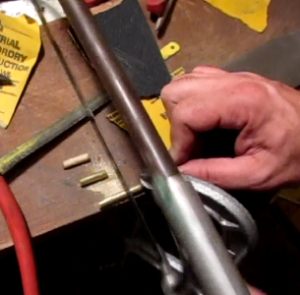
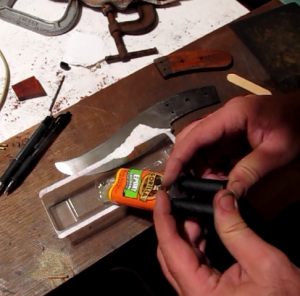
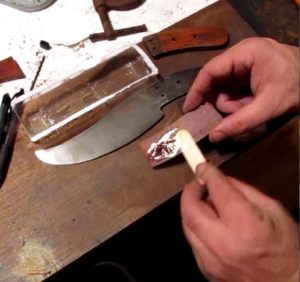
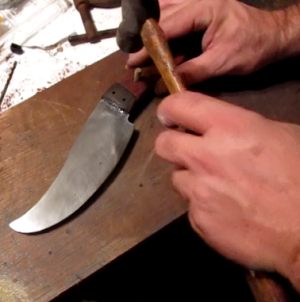
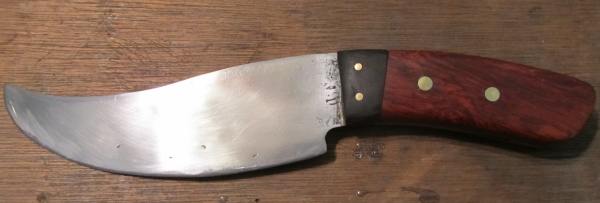
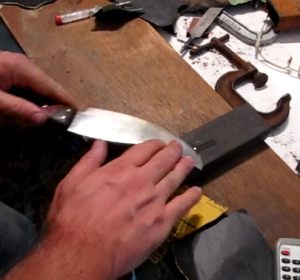 Sharpen the blade and your knife is complete!