Hi, Thanks for visiting my website. My name is Will and if you have questions
or would like to
contribute projects or ideas you can contact me
How to Forge a Knife
This is a step by step tutorial that shows you how to forge a knife. By forging I mean that you take a piece of steel and you shape and form it in the forge and on the anvil.
If you don't have a forge and an anvil you can still make an excellent knife. I do have a tutorial for that. It is called the Stock Removal method of knife making and you use common tools to shape and form your knife. Here is the tutorial for that: Make a knife using the stock removal method
I also have a youtube video that shows this whole process. It is a two part video and you can watch them here.
Will has a youtube channel with over 700 videos on projects you can make. Check it out right here
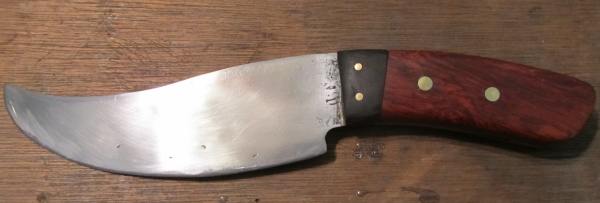
Here is the knife that I make in this tutorial. I take you all the way through the whole process from beginning to end.
It is eleven inches in length. This knife is a little more in depth compared to my first knife making project. For example, this one has a curved blade and curved handle; and it also uses brass pins rather than wooden dowels. I also use a two piece handle which has an ebony bolster (darker section is this bolster) and a mahogany handle. But the biggest thing about this knife is that we forge it in the fire and work it on the anvil.
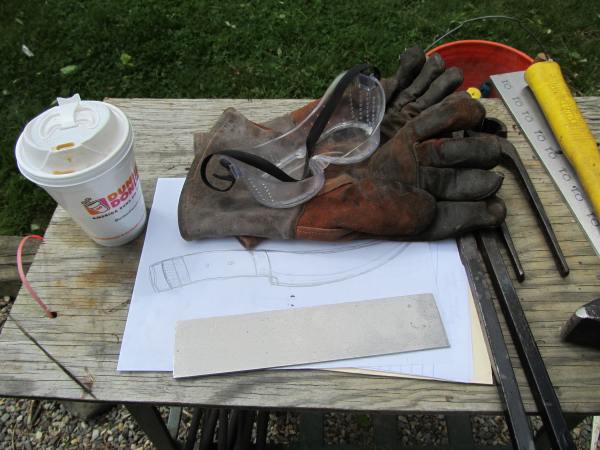
The following picture shows a couple of things I want to point out before starting. The most important thing is to know the shape you are going to make your knife! Gotta have a plan! I figure this out by doing some drawings. In this picture you see the final drawing of the knife I want to make. It is to scale. It is the size of the actual knife to be made.
You can also see the piece of 01 steel that I am using to make the knife. Well, we have to go from that piece of steel to the knife in the drawing so let's get started! (But, make sure you have a cup of the best coffee in the world. (shown in the left of the pic)
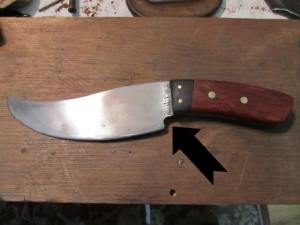
There are two major challenges when it comes to making a knife like this. If you want to make a plain and straight knife it is pretty easy but this one has some pretty serious curves on it. The blade curves up and the handle curves down. So we will have to address this on the anvil. And there is a very big difference in drop between the blade and the handle. This drop is called the choil and there is a very specific technique we use to get this drop.
This picture shows that drop that I am talking about. I will show you the smithing technique for easily getting this drop in the knife.
Let's get started
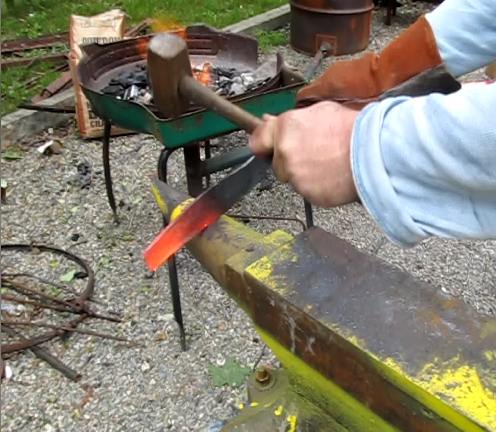
This next picture shows how you will be doing a lot of work on this soon to be knife. You will be hammering on the side of it like this. And this brings up a couple of points.
When you hammer on the side of a piece of metal like this you are doing something called "upsetting the metal" This is squashing the metal down. And it causes the metal to become thicker around the edges. The center of the piece of metal stays the same thickness but all around the edges it gets thicker.
You have to continuously work this by hammering on the edge like this then laying the piece down flat on the anvil and flattening it out.
But the most important thing I show with this picture is the offset hammering I am doing. I am striking the knife a little to the left. Not directly above the horn of the anvil. This offset striking causes the whole piece to slowly bend. And this is how we get our curve.
Remember that it isn't just the side of the hammering that is affected. The side against the anvil also is worked on at the same time.
So this is what you do, continuously work the piece to get the curves you want. Use the surface of the anvil and the horn of the anvil.
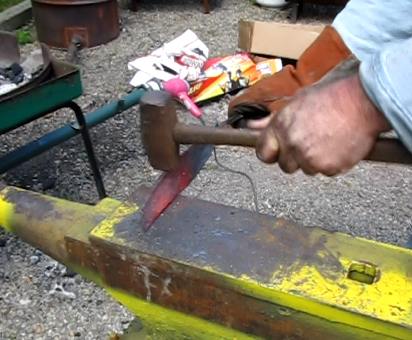
Now the Drop Choil
Okie, I talked about that big drop in the knife between the blade and the handle. So how do we do that?
Well, start that shape early on. Don't finish curving the blade then do this! start this very early. You could even do this before you start the curving. This is called Half-face hammering. You put the knife half way off the anvil. The edge of the anvil is where you want the drop choil to be. And in the case of this knife the blade part is hanging off the anvil. The handle part is on the anvil.
And you strike the piece just as shown. This causes a very distinct drop in the knife. The blade end will stay the same size but the handle half (on top of the anvil) will compress.
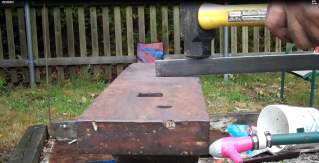
This next picture shows a better angle of half face hammering. It isn't the knife, just a piece of steel. But with this picture you can see how the hammer blows would cause the metal to compress over the anvil and not compress the part hanging over.
So that is the major process for creating the shape of the knife. Continue using these techniques to get the knife as close to the final configuration as you can. We still have more to do however. So lets continue on with the tutorial.
You don't need to spend a fortune to start making fantastic knives. Noted knifemaker Wayne Goddard provides outstanding step-by-step instructions for making your own tools, finding the right steel and forging, grinding and heat-treating knives on a budget.
The Backyard Blacksmith shows you how -- with some patience and a working knowledge of metals, basic tools, and techniques -- blacksmithing can be easy to learn, and a rewarding hobby. Through instructions and illustrations, readers will learn to make simple tools and useful items, such as nails, hinges, and handles, and also an interesting mix of artful projects, such letter openers, door knockers and botanical ornaments.
Do you like making projects and exploring a variety of hobbies?
Sign up for my free newsletter. I give you regular updates on hobbies and projects you can make. it is totally free and I don't share your email with anybody.