How to Make a Popsicle Stick Mini Trebuchet
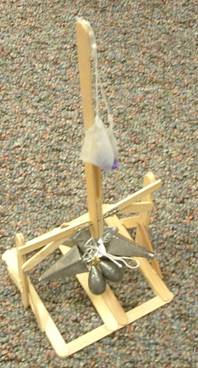
Trebuchet (Counterweight powered)
 Note from Will: This awesome little trebuchet was built and designed by Tom Wilson. He also put together this great tutorial. My thanks to him for this! It's a fun and effective little project.
Pros:
- Historically Authentic
- Looks very cool
- Silent
- Powerful and accurate if "tuned" correctly
- Doesn't wear out
Cons:
- Very difficult to build-you might not get it finished
- Tricky to tune so it shoots well
- Slow rate of fire
Materials:
- 15 full popsicle sticks
- 5 Popsicle sticks cut in half
- Three pieces of string:
- 3"
- 3" with a loop tied in the end (Tie the loop first, then measure)
- 12"
- 1X3" piece of plastic grocery bag
- A 1 ½" Finishing Nail
- A paperclip
- Fishing weights
- Hot glue
How to Build It:
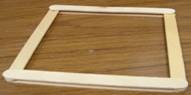
• Make the base.
• Glue together six sticks in a square, "log cabin" style.
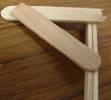
• Make the uprights
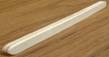
• Glue two sticks together for strength. This is your upright.
• Glue a half-stick to the side of the upright as shown below. It should stick out about 1/16 of an inch past the upright. This is your cross-beam.
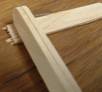
• Reinforce cross-beam with another half stick as shown below.
• Repeat previous three steps to make a second upright.
• Attach the uprights to the base.
• Glue the uprights in the middle of the thick sides, with the cross-beams pointing in.
• There should be a space of at least 3/8" between the cross-beams.
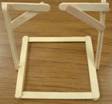
• Using four half sticks (two on each side), make braces on each upright, forming an upside-down "V".

• Build the Throwing Arm.
• Make the arm:
• Connect two full sticks with a half stick, as shown. This is the bottom of the arm.
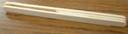
• Glue a full stick into the space on the top side of the arm.

???How could changing the arm length affect the performance of the catapult?
• Get an adult to help drill two holes in the bottom of the arm, about ¼" and ¾" up from the bottom.
• Attach the sling and the pin
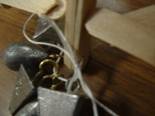
• PIN: Using pliers, bend a piece of stiff but thin wire (a paperclip works perfectly) into a sharp "J" shape.

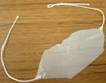
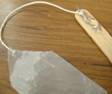
• SLING: Cut the ends of your plastic into "V" points. Using a small dot of glue, attach a 3-3 ½ " string to one point. Attach a 3" string with a loop on the end to the other point.
• Glue the pin to the top of the arm so the top of the "J" sticks out about 1/8". Use plenty of glue for this: It has to be on very solidly.
• While the glue on the pin is still warm, attach the end of the straight string. The sling and the looped string should hang down freely.
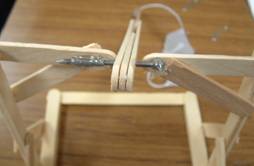
• Attach the throwing arm to the base.
• Insert the nail through the upper hole in the arm.
!! You might have to really work it to get it through. BE CAREFUL NOT TO STAB YOURSELF!
• Using plenty of glue, attach the ends of the nail to the cross-beams.
!! If your catapult breaks, it will probably be at this joint, so use plenty of glue and make it secure!
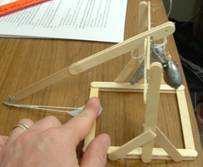
• Attach the Weights.
• Tip your trebuchet forward so the bottom of the throwing arm is touching the table.
• Insert your 1' string through the bottom hole on the arm.
Use the string to tie on the desired weights.
??How will changing the amount of weight affect your catapult's performance? Are there any risks?
• Firing
• Loading and releasing
• Fold the sling in half over your projectile.
• Place sling loop over pin.
• Pull throwing arm down to the ground, with sling lying flat on ground pointed toward base.
• Hold sling in place with one finger. Quickly remove finger to release.
• Tuning.
!!Make small adjustments, one at a time, until you achieve the desired performance. Making huge adjustments, or several adjustments at a time, can have unpredictable results!
• If sling doesn't fly over the top of the throwing arm, you need either more weight or a lighter projectile.
• If loop doesn't release, you might have twisted sling strings, or your pin might be too long, nicked, or gunked up with glue.
• If trajectory is too high (the projectile flies straight up or backwards), use pliers to bend pin slightly forward. This will delay the release of the sling, making for a flatter trajectory.
• If trajectory is too low (the projectile flies downward into the ground), use pliers to bend the pin slightly backward. This will release the loop sooner, causing a higher trajectory.

Popsicle sticks have been a staple of easy and creative fun for as long as there have been popsicles. A little glue, paint or other things can really set the creative wheels in motion. Here is a book of more projects with craft sticks
Look What You Can Make With Craft Sticks: Over 80 Pictured Crafts and Dozens of Other Ideas (Craft)


