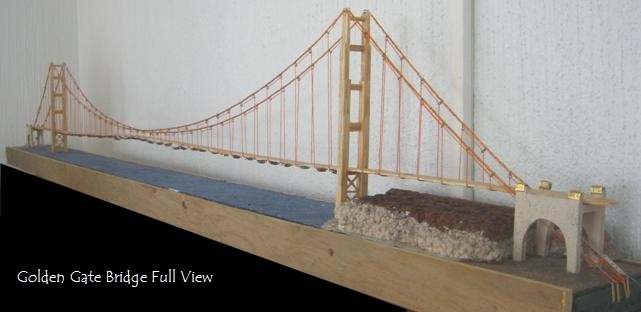
Notes on constructing Golden Gate Bridge ( GGB ) replica
Scale - 1000:1 Project Created and submitted by David O.
Constructed out of matchsticks, the important part is to be able to use templates as guides so as to be able to build an accurate, straight reproduction. I got a GGB tower template on-line, enlarged it to be roughly the scale that I (thought I) wanted (roughly 8 inches tall), laid a piece of waxed paper over it, laid guides alongside, and placed the three stacks of matchsticks in nice, even stacks. Again, an important feature is to not "free hand" the construction; use templates and guides wherever you can. I pretty much figured out how to "scale" this model, and it's pretty easy. Each tower is 746 tall above the water, which equals 8,952 inches. Since my towers are 8 inches, I divided 8 into 8,952 and got 0.00089 which is pretty darn close to 1/1000. If my towers were just a bit taller, say 8 ¾ inches, then I'd really have nailed it. Find the length of the middle span, the side spans, the roadway width, and multiply everything by 1,000 (OK, 0.00089), to get the proper scaling. I used this for the height of the center of the span above the "water", too.
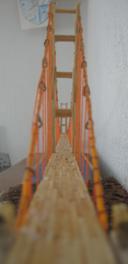
 An easy solution to constructing the roughly 45 inch long middle span was by turning over an aluminum meter stick, and using the center "channel" as a guide for my roadway, which was just less than an inch wide. The channel fit 10 matchsticks across nice and snug as I glued them. Another important feature to add strength to this relatively delicate model was to use overlapping joints with your matchsticks. Instead of gluing them end to end, overlap every other match so that there are never two adjacent "butt end" seams. An easy solution to constructing the roughly 45 inch long middle span was by turning over an aluminum meter stick, and using the center "channel" as a guide for my roadway, which was just less than an inch wide. The channel fit 10 matchsticks across nice and snug as I glued them. Another important feature to add strength to this relatively delicate model was to use overlapping joints with your matchsticks. Instead of gluing them end to end, overlap every other match so that there are never two adjacent "butt end" seams.
 I found a nice, long (roughly 6 feet) piece of Styrofoam that I cut down to four inches wide which acts as my base. After determining how far apart to set my towers (based upon the roughly 1:1000 scale), I glued the north tower terrain feature on top of the base and painted it. I then applied common white latex caulk to the "water" under the bridge, smeared it around to cover any indication of the Styrofoam, let it dry, then painted that a nice deep ocean blue. The south tower is out in the water, while the north tower is on a point of land. Beyond each tower are the anchor structures for the main cables. These were set back about 8 inches from the towers (I had to scale down since my 6 foot long piece of Styrofoam base was just a tad short.), ready to receive the main cable. I made these anchor structures out of foam core, with an arch to replicate the actual structures, photos of which are available on-line. I hot glued the base of the legs to the Styrofoam base. I found a nice, long (roughly 6 feet) piece of Styrofoam that I cut down to four inches wide which acts as my base. After determining how far apart to set my towers (based upon the roughly 1:1000 scale), I glued the north tower terrain feature on top of the base and painted it. I then applied common white latex caulk to the "water" under the bridge, smeared it around to cover any indication of the Styrofoam, let it dry, then painted that a nice deep ocean blue. The south tower is out in the water, while the north tower is on a point of land. Beyond each tower are the anchor structures for the main cables. These were set back about 8 inches from the towers (I had to scale down since my 6 foot long piece of Styrofoam base was just a tad short.), ready to receive the main cable. I made these anchor structures out of foam core, with an arch to replicate the actual structures, photos of which are available on-line. I hot glued the base of the legs to the Styrofoam base.
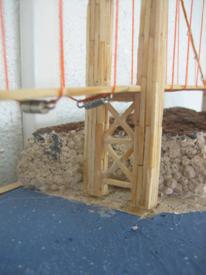
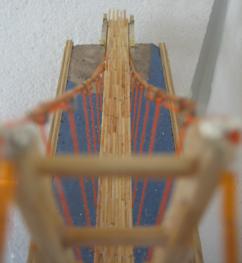
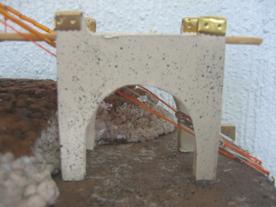
Base of Tower, Water and Cliff Detail
Knowing that there would be some pressure on the towers, I used about two inches of popsicle sticks to act as "feet" for the base of each tower leg. Cutting away a slight indentation in the Styrofoam at the towers allows you to hide these stabilizing features under your "sea" of caulk. Again, even though this is a small model, I was thinking of possible stresses on the towers, as well the need for possibly tensioning both the main suspension cables, and the vertical hanging cables. I used monofilament (fishing line) for the suspension cables, but added beads to provide weight so that the cable would hang properly. Side note: raiding your daughter's beading kit is the hot tip.
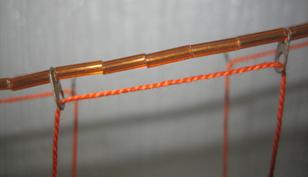
I was amazed at the seemingly made-to-order pieces of tiny hardware that I found in her beading supplies. For the monofilament, I used 5 tiny hollow tubing pieces (I found GGB orange!) between each "hanger", another beading material. Anticipating the vertical hanging cables, I found the absolutely perfect piece from which to thread my future cable. (Difficult to explain - include picture.) Next, I hot glued ear ring stud holders to the tops of each side of the two towers - four stud holders in all) to receive the monofilament cable. The ear ring studs are excellent to use, because they can hold the cable in place, while allowing you to also remove the monofilament if you need to adjust the tubing pieces. (Trust me - it's worth the hassle to use these; buy them!) The entire cabling system is adjustable so that if any of the cables loosen up in the future, I'll be able to tighten them without having to undo any knots or - worse - cut it and have to rethread.
With the roadway deck hot glued to the proper place in the each tower and to the anchor structures, each side cabling can be strung. I used a continuous piece of strong (again GGB orange!) thread tied off near the top of the tower, strung through each vertical cable "eye", under the roadway deck, up to the next "eye", etc., until the thread finally can go under the anchor structure to its own anchor at the end of the Styrofoam base. Tip: I hot glued a popsicle stick to each end of the base perpendicular to the long sides. These sticks act as anchors for the "cables" (both monofilament main cables, and thread hanging cables). Again, raiding my daughter's bead supplies, I found a fish hook shaped piece of hardware that perfectly acts as the anchor for each "cable". Remembering how as a kid I would tighten the guy lines of my pup tent using a "cincher", I again was in luck and came across a delicate, miniature "chainplate" looking piece of hardware that, when the cable thread is run through it, acts like a cincher for future tightening of the cables.
Cable "Hanger Eye" Detail
Because the cotton thread hanger cables don't hang properly by themselves, I had to add weight to each hanger cable. This is the one part of the model that I find unsightly, but I can't figure a way around it. As I threaded each hanger cable under the roadway deck, I threaded a necklace clasp onto the cable so as to add weight and tension to each vertical cable. Otherwise, the roadway deck is not heavy enough to tension these vertical cables. (An idea I had was to glue pennies to the bottom of the roadway deck to add weight along its full length. I might try this if I am bugged by the weights at the bottom of each vertical cable, as they tend to droop if not tensioned properly.) I started my threading from the middle of the span and worked toward each tower, using two separate threads. This should allow easier tensioning in the future. Still, it is timely to thread, add weight, continue threading, tighten (starting from the middle and little by little take up on the slack.), then realize that you didn't tighten it enough, and you start all over.
Finishing touches: when I painted, I spattered black paint using a toothbrush to both the water surface and other painted surfaces. I also spattered white paint on the water, as this seemed more natural, for whitecaps on the wave tops. I like this feature, as it makes the painted area less uniform and adds a simple, yet nice detail. Don't know why I like this so much. Finally, realizing that the Styrofoam base tends to flex when I move it around - ruining the tensioning of the cables - I've added a two inch wide piece of thin plywood (1/4 or 3/8 inch) to each long side of the base to try to stabilize it. I guess I'll use white or hot glue for this. The plywood sides will then be painted black to try to hide them.
The beading supply store will be your new fav place for a project like this. Amazing the delicate, yet very useful pieces of hardware I found. Thanks to the beading store, the cables all look just like the bright orange of the real GGB .
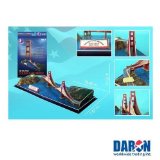  Golden Gate Bridge 3D Puzzle Daron Golden Gate Bridge 3D Puzzle Daron
3D Puzzle. This kit has 20 pieces. It has authentic details, museum quality, no glue required, easy to assemble, sturdy construction & makes a great souvenir. It is over 18" Tall. Warning: Choking Hazard-Small parts. Not for children under 3 years.
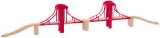  Wooden Golden Gate Bridge w/Track (7) Wooden Golden Gate Bridge w/Track (7)
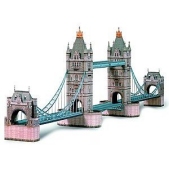  Schreiber-Bogen Tower Bridge in London Card Model Schreiber-Bogen Tower Bridge in London Card Model
The Tower Bridge in London must not be missing among the world famous buildings. The side parts are very elegant; the middle part can be lifted. It is very impressing with its complete model length of one meter. The Tower Bridge is a movable bridge of the double-leaf bascule (drawbridge) type that spans the River Thames between the Greater London boroughs of Tower Hamlets and Southward. It is a distinct landmark that aesthetically complements the Tower of London, which it adjoins. The bridge was completed in 1894 and provides an opening 250' (76 meters) wide. Its twin towers rise 200' (61 meters) above the Thames. Between the towers stretch a pair of glass-covered walkways that are popular among tourists. The walkways were originally designed to allow pedestrians to cross even while the bridge was raised, but they became hangouts for prostitutes and thieves and so were closed from 1909 to 1982. The Tower Bridge was operated by hydraulic pumps driven by steam until 1976, when electric motors were put into operation; the steam power system is still kept (in good repair) as a tourist display. Because of the reduction in shipping at the London Docklands, however, the leaves are now seldom raised. Tools needed to complete construction: mid-sized scissors, modeling knife, water-based glue, ruler or triangle, and modeling pins. Tools Not Included.
|