If you ever wanted to home brew your own wine but thought it seemed too complicated here is a great way to get a first batch going with very little fuss and very little cost. You won’t have to order anything special and in no time at all you will have about four bottles of wine that you made yourself. First let’s take a trip to the supermarket.
Does this cheap, easy and fast recipe really work? It sure does. I got an email from somebody who tried it. Here is a quote of what he had to say about this process:
" Will,
After reading your page I was inspired to try making mead. It looked so simple. Besides the store bought mead that we can buy around Minneapolis doesn't even taste like mead.
I just have to say that I used your suggested method of making mead and was shocked. I made sure I bought only things available in my local Cub super market and I created 3 one gallon batches, one with vanilla, one with mint and one with pomegranate juice. I substituted apple juice for some of the water also.
The result after 6 months was 3 batches of clear mead that tasted great. I did add a few tablespoons of honey into each bottle at the end to give it a little raw sweetness. The taste is very similar to the mead sold at a local fair for $5 a 6 ounce glass, where my mead only cost me about 50 cents for the same glass full.
My friends that are "Mead Masters" are amazed that I got the results I did without any boiling, chemicals, carboys, airlocks or expensive yeasts. In fact one friend was so impressed that he gave me a five gallon carboy and airlock so I can use the recipe on a larger scale. " -Jim (DragonMyst)
Here is a picture of everything you need. This pic was submitted by Andy who is now officially a Mead Maker. Thanks Andy!

Ingredients List to purchase from the Supermarket:
1 Gallon of Spring Water (room temperature, do not get refrigerated)
3 pounds of honey – pure unprocessed
1 bag of balloons big enough to stretch over the mouth of the spring water jug
1 package of Fleishmann’s Yeast
1 box of raisins
1 Orange
Here are some suggestions for variations in this recipe
If you can't get Fleishmann's Yeast here are some perfectly suitable alternates: Narbonne Yeast (Lalvin 71B-1122), Lalvin D-47, or Montpelier Lalvin (K1V-1116)
If you would like to add a bit of spice to this recipe you could add 1 or 2 cloves. But be careful, they are very strong so don't put more than 2.
How to make the Mead
Pour about half of the water into a clean container then slice up your orange into eighth’s and put the slices, honey, twenty-five raisins, and the yeast into the jug. Pour some water back into the jug so the level is a couple of inches from the top then put the cap on it and shake it up well. If you can, you should shake it for a good five minutes. This will aerate the mixture. The yeast really needs lots of oxygen to grow vigorously.
Now poke a pinhole in the top of the balloon, remove the cap from your jug and put the balloon right over the mouth of the jug. Stretch the open end of the balloon right over the jug so that as the gases form inside the jug they will inflate the balloon. Put a rubber band or tape around the neck to keep it firmly in place -if it feels like it might come off. Leave it out on a counter for the first day so you can monitor it.
(Note: The balloon can age and oxidize over time so you should inspect it regularly to make sure it doesn't break down and develop cracks. If it seems like it is breaking down replace it with a new balloon! - My thanks to Tim for submitting this tip)
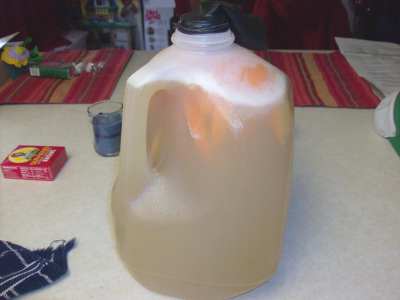
What will happen next?
Somewhere between an hour and twenty-four hours later the balloon will start to inflate. This is a great sign and it means that your yeast is transforming the contents of the jug into wine. Gases are forming inside the jug and are escaping through the pinhole. This setup insures gases escape but no contaminants get into your brew. If the balloon is getting big you may need to poke another hole or two in it. You don’t want it to burst. It would leave your mead open to contamination. Once you are satisfied that the gases are escaping and the balloon is not under unusual stress you can set the jug in a cool dry place like a kitchen cabinet or closet shelf. Check on it every day if you can just to make sure it is ok and the balloon hasn’t popped off.
After two to three weeks the major portion of the ferment will be done and the balloon will be limp. At this point you can taste a little bit to see how it is coming along but it isn’t really a tasty wine at this point. It will need another couple of months to start to get delicious. Over time, as you check on it you will notice that the cloudiness disappears and it slowly clarifies and transforms into wine.
The Orange and the raisins can stay in the mixture for the whole duration but if you want to make the mead a little milder and help it clarify faster you can transfer the liquid into another gallon jug and place the balloon on that one. This would be after the two to three week ferment period has completed. This process is called racking and it will move your mead along nicely.
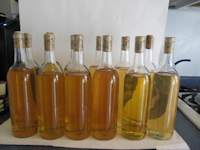
Here is a picture of the completed batch. Now it is time to just sit back and watch the yeast do its thing! Pic submitted by Andy.
Some Tips
You can make the honey easier to pour by letting it stand in a sink or bowl of warm water. And you can experiment with the flavor a bit by adding a cinnamon stick or a pinch of nutmeg to the batch when you add the orange. Don’t leave out the raisins. They are not there for taste. They are a necessary food for the yeast because honey is a bit low in the nutrients that yeast like. If the honey is a bit expensive you can cut this down to two pounds. Any quantity between two and three and a half pounds will work well and the more honey you put the sweeter the mead will be. But, the more honey you put the longer it will take to mature.
Finally
Be patient and taste your mead every few weeks. It should be really clear and delicious after a few months. It will continue to age and improve over a long period of time so the longer you wait the better it will get. If you are struggling with this then you should probably make another batch! Try to wait six months if you can!
Addendum to this tutorial on mead making:The importance of Sanitation
One of the most important aspects of mead making is sanitization. It is very important that you sanitize everything when you are making mead. Let me explain why!
When mixing up your honey, water and other things you are making a food environment. It is a place loaded with nutrients for yeast and that means it can be easy for other types of unwanted yeast or bacteria to quickly grow! It's almost like a little incubator :) What you want is to make sure no outside yeast or cells develop other than the yeast you pitch. This means you should sanitize everything that comes in contact with your new batch of mead including the jug, spoons and measuring cups.
Doing this sanitizing will add a litte extra work but it is well worth it. It greatly improves your chances of making a wonderful tasting mead.
The Nuts and Bolts of Sanitizing Mead:
I have a video you can watch that will help you understand sanitation here: Sanitization of Mead
I use store bought wine making chemical for sanitizing and you can easily get around this by using Chlorine Bleach and here is an article that will help you: Using Bleach for sanitizing food equipment In summary:
"about one tablespoon (1/2 fluid ounce, 15
ml) of typical chlorine bleach per gallon of water is the maximum
that should be used for sanitizing food contact surfaces, according
to federal regulation".
Want to see some videos of how to make mead? I have a youtube channel playlist that currently has 30 Mead making videos here

I found a whole bunch of wonderful drinking goblets on amazon. I have a page with them right here. Just a couple of years ago you couldn't get a goblet, or mead! It is great to see both are becoming very popular. Mead Goblets
Make a peach or pineapple fruit mead
If you have always wanted to make a fruit mead (melomel) you might want to check this tutorial out. I take you through the whole process from start to finish including bottling. Make a Peach or Pineapple Melomel
PRODUCTS
|