
![]()
I have a youtube channel with over 1000 Videos!
Music/tutorials
- Classical Guitar Home
- Classical Guitar Sheet Music
- Free sheet music in pdf form
- Guitar Store
- Book Store
- Tutorial
- For Beginners
- Free MP3's
- Instructional Books
- Starter Kit
- online tuning tool
- Guitarists
- Accessories
- CD's
- Spanish Guitar
- Spanish Classical Guitar
- Guitar Terms & Symbols
Guitars and More
- Spanish Guitar Music (CD's)
- Guitar Hangers
- Classical Guitars on ebay
- 3/4 size Classical Guitars
- Esteban Classical Guitar
- Bach for Classical Guitar
- Left Handed Classical Guitars
- Best Selling Classical guitar CD's
- Classical Guitar DVD's
- Classical Guitar Songs
- Classical Guitar Straps
- LaPatrie Classical Guitars
- Beatles for Classical Guitar
- Christmas Songs for Classical Guitar
- Classical Guitar Videos
- Classical Guitar Events
- Profiles in Classical Guitar
- Classical Guitar Strings
- Nylon Classical Guitars
- Classical Guitar Tuning
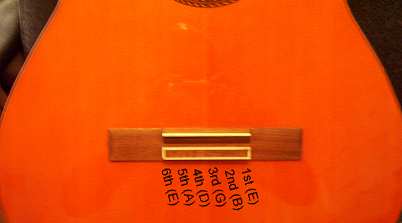
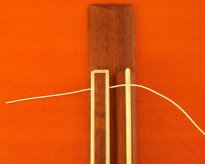
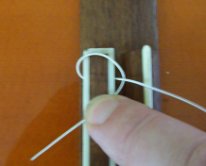
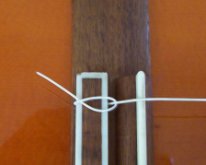
- Stringing the Guitar
- Video on stringing the classical guitar
- Classical Guitar Magazines
- Classical Guitar Making
- History of the Classical Guitar
- Classical Guitar words, terms and definitions
- Web Resources for buying Classical Guitars and related items
- Learning to Read Classical Guitar music
- Classical Guitar Songs
- Flavoring the Classical Guitar
- Classical Guitar on Fire
- Why Classical Guitar is a good instrument for children to learn
- How to advance quickly in your guitar playing
- Forget about learning TAB - Here's why
- Advice on buying a classical guitar
- A suggested repertoire for the beginner
More Stuff
- Will's Classical Guitar Articles
- Andres Segovia
- Yamaha Guitars, about them and the different series
- The Tuning Tool
- The Dictionary of Guitar sheet music terms and symbols
- List of Classical Guitar Societies you can join
- Boston Classical Guitar Society
- Classical Guitars on Amazon
- Classical Guitar Sheet music on Amazon
Will's Subjects
- Blacksmithing
- Bonsai
- Catapults
- Dioramas
- Fantasy Art School
- Goldfish
- Leathercrafting
- Military Dioramas
- Make Video Games
- Model Rockets
- Nature projects
- Origami
- Paper Making
- Paper Games
- Paper Projects
- RC Airplanes
- Science Projects
- Stained Glass
- Stamp Collecting
- Stop Motion Animation
- Tatebanko
- Terrariums
- Trebuchets

Hi, Thanks for visiting my website. My name is Will and if you have questions
or would like to
contribute projects or ideas you can contact me