Here is what Pierre has to say about this project:
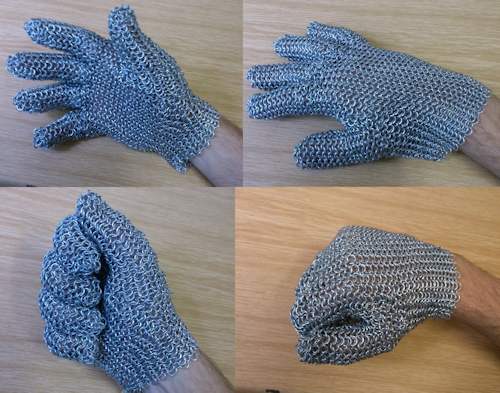
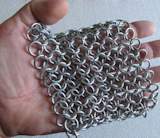
- I finally finished the chainmail glove i was working on, attached is a picture of it. I bet it's common knowledge for someone with your amount of research about all things medieval, but just today I figured out how to get my chainmail shiny (this glove was a dark grey dull blob of metal before today). Previously I let it soak in bleach over night, but thats just cleaning. Ammonia seems to clean just as well and it's not as "dangerous" to handle. By rubbing a piece of chainmail repeatedly, the rings will scratch each other creating a pretty decent polished surface on the rings(I rubbed this glove for like 20 minutes to get this shine, it's kinda like washing clothes by hand)
Now to get the weave right was a challenge every step of the way, I had to connect horizontal weaves with vertical ones almost everywhere, that's why it seems bumpy in some spots. But I learned a lot from this, like how tot weave two vertical pieces that are also triangles (like your coif design's pizza slices, but with the weave going perpendicular to your direction). It seams to blend in with the surrounding pattern but it's really stiff.
Here are the specifications:
Total weight : 600g
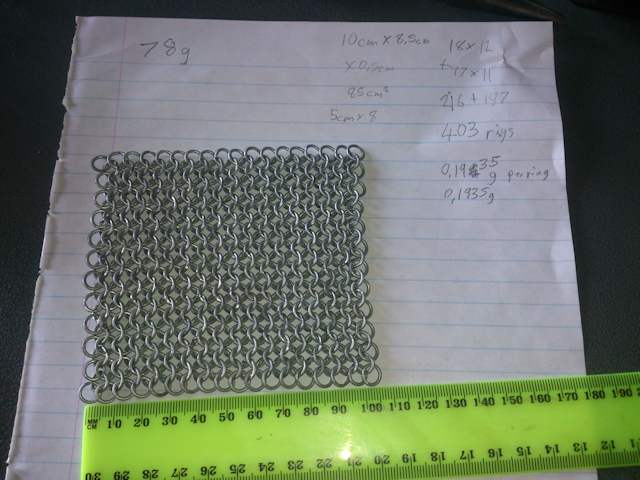
- Total Rings : 3141
- Ring Size(diameter) : 7mm
- Amount of wire used : 69m
- Total time spent : 55 hours(estimate)
He tells us more about making the glove:
Most of it was trial and error, sometimes after 2 hours of connecting a certain piece I would test the glove and realize that it didn't fit at all...then I would open up all those rings again and try a different solution.
Anyway I will see what I can do, maybe I can create some pictures explaining that weave or like how to get the fingers to bend more and stuff like that :)
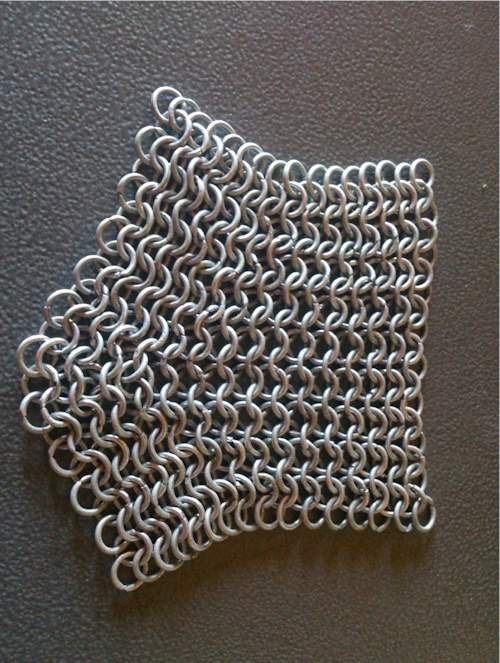
In the mean time, here are the rest of the pictures I took of the glove previously. and an explanation of how I built it along the way. I guess the other way to build a glove would be to create two chainmail cloths, each the shape of a hand print, then stitch them together.
Tips:
Firstly, for anyone attempting this I would recommend making a simpler pieces of chainmail armor first. I learned a huge set of skills while making my coif, without them this glove would only have been 2 rings big... Weave with at least 8mm rings. Any bigger won't be very comfortable around your fingers. Use a metal file
Build the glove in a slightly closed hand shape (the shape your hand is in when holding a computer mouse).
If you used high quality shinny wire, I doubt the treatment will do much.
Historically people use to clean chainmail of rust by throwing it in a barrel half full with sand, and rolling the barrel. this might also work for the polish shine (I didn't do this though).
Fingers:
I started this with the fingers first. Just make a square piece of chainmail that can barely wrap around your finger(remember the connecting rings will enlarge the circumference of this "tube"). I chose to have the weave pattern going along the length of the finger(so that it can extend somewhat as you bend your fingers). These should be as long as your whole finger, but not too tight around your finger (a little loose is best).
Also you need to enlarge the circumference at the base of this tube(near your palm, opposite to fingertips). This tube should have a circumference about 50% LARGER than at the base than at the finger tips (just count the amount of rings as your measurement units). That size seems ridiculously big, but once you connect all the parts they start to constrict at those points
Now, to create those enlargements was my first challenge. Will's chainmail Coif tutorial gave me a great idea on how to do this, by connecting two triangular pieces as your first "square piece of chainmail" and then wrapping it up you get a cone shaped tube...but the coif video has a weave pattern going in a different direction. To connect triangles in this situation requires a different technique (The closeup picture shows the technique used to solve this). To create the thumb piece is similar to the rest, except you need to enlarge the base much more, until it can touch your palm.
Stitching Fingers:
 When you are done with all fingers (or even just a few) you can connect them together. fit them all on hand, position them for a natural fit and them look closely which rings you want to link. I used markers for this (bending rings with one hand is a bit difficult), any piece of plastic that can stay stuck in a ring is good enough. Keep connecting them and stop when you are one ring away from the top and bottom (backside of hand and palm of hand). Remember that after connecting the index and middle finger, then you will have a slightly twisted middle finger (chainmail piece of course). so you need to link only 2 rings between fingers at a time and repeat this to link them little by little. You will need to bend the rules of chainmail weaving to link the thumb and even for the other fingers as well. You may need to add a band of chainmail along the index-pinky fingers before you can link the thumb. When you are done with all fingers (or even just a few) you can connect them together. fit them all on hand, position them for a natural fit and them look closely which rings you want to link. I used markers for this (bending rings with one hand is a bit difficult), any piece of plastic that can stay stuck in a ring is good enough. Keep connecting them and stop when you are one ring away from the top and bottom (backside of hand and palm of hand). Remember that after connecting the index and middle finger, then you will have a slightly twisted middle finger (chainmail piece of course). so you need to link only 2 rings between fingers at a time and repeat this to link them little by little. You will need to bend the rules of chainmail weaving to link the thumb and even for the other fingers as well. You may need to add a band of chainmail along the index-pinky fingers before you can link the thumb.
Palm and Backhand:
You will need a rectangular piece of chainmail big enough to cover the backside and palm of your hand. link this to the finger pieces along the opposite side of your thumb. Keep it in the same pattern direction as the fingers (the thumb should be different from this). To connect the thumb here requires some trial and error, just go with what feels right/better. link a ring in one direction, try different techniques until you find one you like. Remember the half closed hand shape, build more ring to the thumb so that when connected it does not resemble a flat hand shape.
When connecting the palm-backhand piece, you can add/remove rings from the part where the fingers link. it should be comfortable there when bending individual fingers.
Wrist:
When all pieces are linked, just keep adding 4in1 belts to the wrist portion. You will need to do an expanding weave (but in reverse) to make the wrist part tighter, somewhere near bottom part of your palm. use the same technique that made the finger bases larger, just remove rings instead of adding rings.
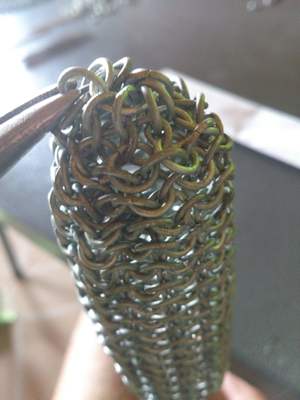
Fingertips:
Now you should have a glove with open finger tips. To close them, do a retracting weave(like with the wrist) at the fingertips until they are small enough(mine has a 14 ring circumference, but it depends on your ring/finger size). Create a 7in1 piece...like a 4in1 but with 7. This will be the center ring at the finger tip. link the finger to this piece. If this piece has too many rings it will not feel like chainmail, so you may need to do more retracting weave. If you use a bigger center ring for the 7in1, it feels more flexible but it's not so great looking (you need a bigger center ring for the thumb though). to make this easier, put something inside the glove's finger, like a lighter.
Finger bends:
You should realize that the fingers are still "flat hand" shaped(except the thumb). fit the glove and figure out where the rings of your bending finger clump together(usually near the bottom 1/3 of the finger). Remove rings to leave diamond (like poker card's diamond) shaped hole in the chainmail(the diamond should wrap half the finger). now stitch it back together using open rings BUT without adding back the extra rings. do this for all fingers(thumb is similar here).
Your last step is to check for comparability once more. Fix anything that bothers you now, even if its just a random ring poking out(around the thumb should be some of those). try linking them diffrently, or remove the alltogether. between the thumb and the index finger should be an extending weave that feels like a solid iron ingot in your hand...try removing a row of rings there (perpendicular to the thumb/pattern direction) and link it back together with less rings if possible.
Chemical treatment and polish:
If you are completely done and comfortable with the shape, it's time to treat the metal. You need some bleach OR ammonia, about 500ml should be enough. (if you have both, then let it soak in bleach for 2 hours, rinse and then follow the next step [I don't know if bleach does something else, it seems to do the same job as ammonia but I had mine in bleach before I got some ammonia]) Let it soak in ammonia for at least an hour (if 500ml does not soak it, just turn it over every half hour). If you have rubber gloves, use them. if not, nothing will happen to your hands (except extreme cleanness :P). Rub the chainmail against itself, vigorously. don't worry, if you used wire as thick as mine you shouldn't be able to break it with your bare hands (pun not intended). The wrist piece can be rolled between two hands, the finger can be twister and twirled repeatedly and after some 5 minutes you will see a difference. keep doing this for 15 minutes at least. when you are happy, rinse it off in water and immediately dry it using some cloth, a towel, anything. a fan will also help dry it.
I am really not sure how much rust it will accumulate, some people treat their chainmail with oil every few months, but I dont.
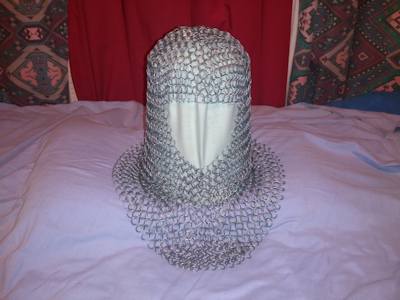
Pierre has also made a chainmail coif:
How to make chainmail: This is a tutorial that shows you step-by-step how to make chain mail. I show you which wire to use, how to create the rings and how to weave the actual mail. How to make chainmail. I will also be doing a tutorial on how to make a piece of chainmail armor.

Do you like making projects and exploring a variety of hobbies?
Sign up for my free newsletter. I give you regular updates on hobbies and projects you can make. it is totally free and I don't share your email with anybody.
|