<aking Miniatures Banner

Home

Home

Youtube graphic
I have a youtube channel with over 1000 Videos!


Become a Patron

Wills Pinterest !


Painting Tutorials

Sculplting Miniatures

More Tutorials

Supplies

Short Tutorials

Subjects


Will
Hi, Thanks for visiting my website. My name is Will and if you have questions
or would like to
contribute projects or ideas you can contact me Will

Painting Miniatures tutorial part 5 : How to figure out what to paint first


One important concept you have to know when painting a miniature is the way you apply the paints. You don't just start with a color then work your way through the different parts of the miniature. Think of painting a miniature as if you are dressing it up! You would do the bare skin first then apply the color of the undergarments, then the overgarments then the various accessories like jewelry or in this case the saddle, bridle and reins etc.

So we start with the lowest level on this miniature which is the horse itself,. This horse is going to be brown so we need to start with the brown paint of the horse.


Artistic Concept of color when doing a miniature

Now before we actually paint the horse we need to step back and talk a bit about color and how an artist sees it. This horse is brown but is it only one shade of brown? Nope! There are sections of the horse that are a darker brown than the rest. These are the sections deep inside gullies and ravines. For example, the place where the leg muscles meet with the abdomen. This area of the horse is the same color as the rest of the horse but not as much light gets in that area so it looks darker than other parts of the horse. Think of it as shading in the dark areas.


So, use more than one shade of a color for large parts of your miniature. This will give it a very realistic look.


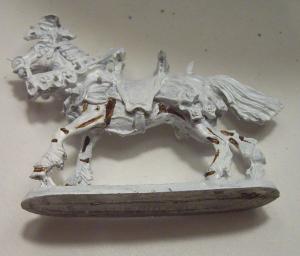
The unpainted horse

First paint to apply? The dark areas where the muscles meet (darker brown)

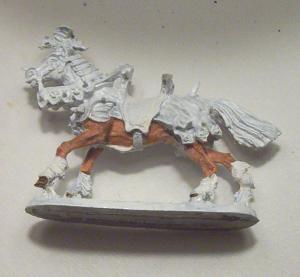
This image shows the dark brown applied to the legs of the horse. I used a burnt umber for this. And for the normal brown of the horse I will use a burnt sienna.


Starting the painting

Then you apply the lighter brown to the rest of the brown areas of the horse. When doing these lighter areas of the horse you can actually often just use the light brown and as you are painting you can blend it right into the darker areas. Applying the new paint will moisten the dark paint and cause it to liquify and run a bit. This will mix the two and give you a really good look.

If I had painted the horses legs all one color we wouldn't get the really good muscle definition you can see here. This kind of detail makes all the difference when painting miniatures. .

This technique of putting in the dark paint first then the lighter paint second will look perfect on the horses tail. See how theire are big deep slashes between the strands of horse tail? The dark/light will show this off really well.


Painting Tips:

If you don't have two available shades of the same color you can mix the color with either white or black to get the second shade. This works perfectly fine. Experiment with the colors and the shades. With some practice you can mix and paint on the fly by doing the deepest sections with the pure color then adding a little white and doing the outer sections.

Because you are working with a miniature it is perfectly ok to exaggerate the muscle definition a bit more than you would normally see it. Because everything is so small a bit of exaggeration will bring out the definition much better.

Remember: You really can't make a mistake. If you don't like it just let it dry then paint over it! Your eye, and your ability will quickly improve with a bit of practice.


How to hold the brush

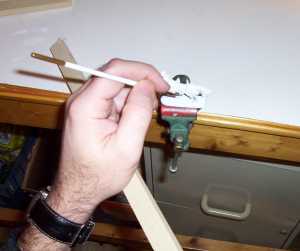
Having trouble holding your hand still?

This is a trick that many artists use when they are painting or drawing on a canvas or easel. They hold a large stick in one hand and support their painting hand on it. This is a great tip and makes a big difference in how steady you can hold your hand.

NextContinue with tutorial - Finishing up the miniature by painting the next levels then sealing it with spray sealer.


Book: Painting ancient and medieval warriors

Painting Ancient and Medieval Warriors (Schiffer Book for Hobbyists)

Small figures of ancient and medieval warriors clad in leather or metal armor, available at any toy or hobby store, make wonderful, challenging figures to paint. Using clear, concise instructions and detailed photographic illustrations, Mike Davidson guides readers through the steps necessary to first prepare, then paint, and finally display these tiny replica warriors of ages past. Both hobby and oil paints are used to complete these figures, their armor, and their weaponry. Mike also provides instructions for painting realistic display backgrounds. Additionally, formulas for mixing a variety of useful colors are included.