Hi, Thanks for visiting my website. My name is Will and if you have questions
or would like to
contribute projects or ideas you can contact me
Part 4: Testing, calibrating and balancing the plane
Your plane is all assembled and ready to go and you are excited to get it out there and fly it . But you are not done with it yet. There are still some things left to do. You have to test everything to make sure it all works. You also have to calibrate the servos and controls (I will explain what this is and how it is done. And you have to balance the airplane. So, once you have all these things done then you can get that plane out there and fly it!!
Note: At the bottom of this page I have a video that shows you some of this and explains the process a bit. I don't actually do the calibrating but if it is confusing for you watching this video will help clarify things.
First lets test everything to make sure it works and works correctly.
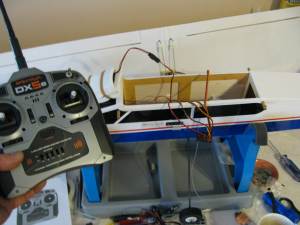
This is where you will use your hand held transmitter. So grab the book for the transmitter and receiver and follow the recommended testing and set up instructions. They vary from unit to unit but I will give you an overview here so you get an understanding of what to do.
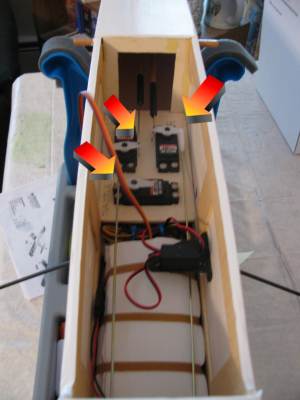
If you have put the wings on the plane you will need to take them off for the testing and calibrating. But leave the servo on the wings connected so you can test it.
Before powering anything up you will need to disconnect all the control rods from the servos! This is important and don't forget to disconnect the one on the wings too.
So now you power up the transmitter and power up the plane by the switch you installed in the side.
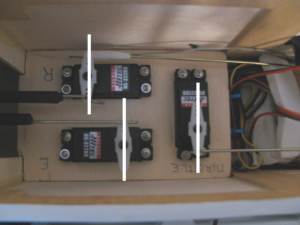
The servos should all react. They will rotate a bit and find their center points.
This picture shows the servos after they have been powered up. (My control rods are connected because I took this picture afterward) but your control rods should be disconnected. Now the white servo horns should be perpendicular or parallel to the servo. Either one is ok. But they probably won't be.So what you do is take off the little screw that holds the horn on, remove the horn the place it back on so it is perpendicular or parallel to the servo.
This puts all the servos in their neutral or zero position. Now you can go ahead and re-connect the control rods. Do it carefully without rotating the servos. And if need be you remove the white horn, connect the rod, then screw the horn back down in the correct position.
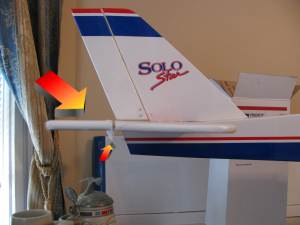
Now you have to visually inspect the actual control surfaces on the airplane. In this picture we are looking at the elevator. See how mine is just slightly tilted down. It isn't on an exact plane with the rest of the tail. Not much off though and probably ok. What you would do is to disconnct the linkage shown by the small arrow and turn the threaded linkage on the rod so it adjusts how this elevator sits in its normal position. You adjust this until it is nice and straight. Now the servo is centered and the elevator is leveled. It is calibrated. You do this with all the controls including the rudder, wheel and even the carbuerator.
Next you turn it back on again and use the controls on the hand held transmitter and see how all the control surfaces react. They should have a certain amount of movement and the documentation that comes with your plane will tell you the correct amount of movement.
And it is quite possible that the directions are reversed. This means that when you move the joystick say to have the plane go up it would actually go down! This is easily fixed by throwing a servo reversing switch on your transmitter.
Balancing the Airplane
One final step is the balancing of the plane and this is an important step - do not skip this step. It is a matter of finding the center of gravity of the plane and checking your documentation to see if it is where it is supposed to be. If not, you can adjust some of the components inside the plane or you can add weights. However you do it be sure to do it!!