Hi, Thanks for visiting my website. My name is Will and if you have questions
or would like to
contribute projects or ideas you can contact me
The Gas Powered RC Airplane Project Continued
This is a continuation of my project on making an ARF Model Airplane. You can start at page one of this series here.
Since beginning this project I have put about ten hours of work into it and it isn't yet complete. It is fun and interesting but I didn't realize it was this much work. It is an ARF which means "Almost Ready to Fly" and it is about 90% done so you probably can guess that when you get to this stage of Airplane building you have got to invest some serious time into it!
I have done this is a logical manner though! I didn't just jump into this kind of a plane with no experience. This is my third plane. My first one was a small electric one, and my second one was a larger electric one (Japanese Zero). I probably would have derived some benefit from adding a third to this list. There is a nice electric plane kit that is a piper cub. It takes about 20 minutes to assemble and it comes with absolutely everything you need to fly it.
I have found that there is some expense with this hobby when you want to get into it at this level. The plane kit itself cost me just under $100 but it doesn't include much. I still had to purchase the engine, Radio controller, Receiver, glue and some other things. Despite all this I think it is an excellent value. I definitely got my moneys worth. I will go over some of these things so you know what you are going to need. And I will cover some of the assembly of this plane too.
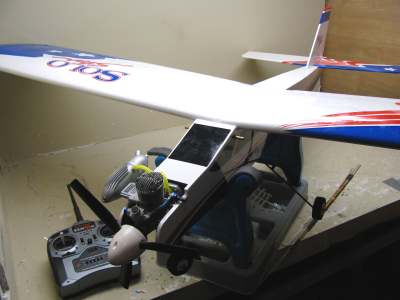
Here is the airplane as I currently have it. You can see that the wings and tail assembly are completed and the engine with propellor is installed. Landing gear is installed too.
Some Notes and Information about this Assembly
First off you should know that even though a plane like this is 90% complete (and it's the hard part that is complete) It is still quite a bit of detailed work and you should have some good mechanical skills.
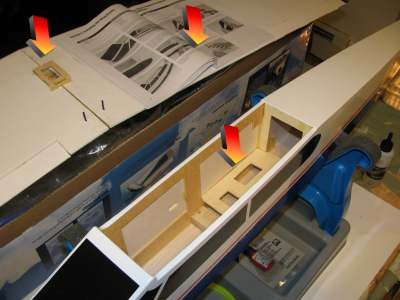
This picture shows some of the assembly at this stage of the build. The three arrows show from clockwise left:
The Servo tray inserted into where the two wings meet. You have to cut out a hole for the tray, build the tray then insert it into the hole.
The instruction manual
The servo tray inside the fuselage that holds three servos.
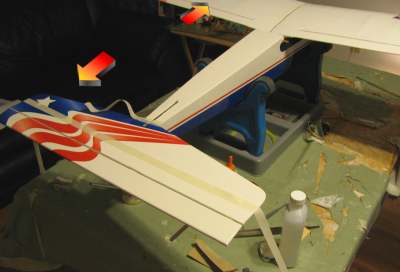
This picture shows some of the assembly of the wings and tail assembly. The tail assembly is securely fixed to the fuselage with a strong two part glue. The Wing is made up of two wing halves that you glue together and they attach to the fuselage with a pair of rubber bands. This allows it to break away if there is trouble and allows you to easily take it apart when you want to transport it. If you have watched my video on this plane you know that it is enormous and impossible to transport around if you couldn't separate the wings from the fuselage. It sure wouldn't fit in my car.
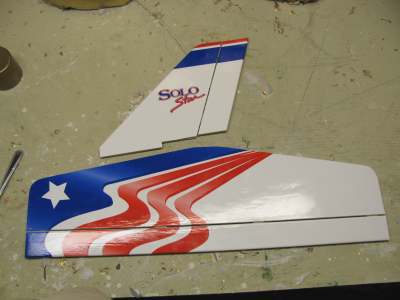
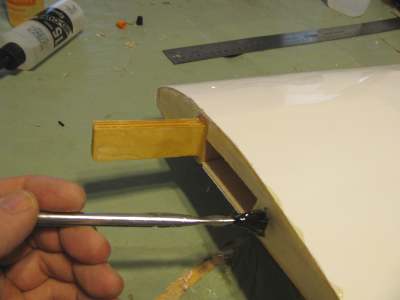
Here is the tail assembly. The control flaps on these sections need to be glue into place by small connecting plastic hinges. You glue these in and, you can see the gaps, these flaps will hinge freely and be controlled by the servos. This is so you can control the plane.
You have to do this same thing with the ailerons on the wings.
Dihedral Wings
This is one of the most important parts of the whole process. The glueing of the wings together.
It takes some work and you need to take your time but it isn't very hard.
These wings (on a trainer) are called Dihedral wings because they have an angle to each other. This gives it a very stable flight characteristic. I will tell you more about Dihedral wings.
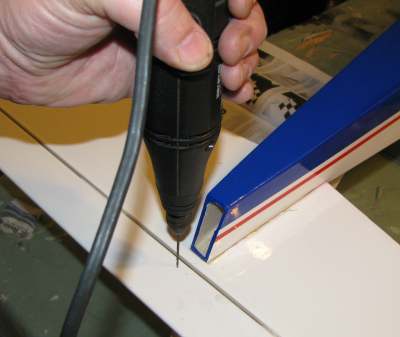
Once you get most of the airplane parts physically built you will move on to the more sophisticated parts of the airplane like the controls.
You are going to need to do some drilling. What I am doing here is drilling holes to mount the control horns. I will show you what that is all about.
SAFE technology is a revolutionary leap forward in flight control and training. Key Features SAFE technology provides spatial awareness and flight envelope protection The ideal beginner's choice when learning to fly with an instructor Quick, easy assembly Lightweight and durable Z-Foam construction Powerful 15-size, 840Kv brushless out runner motor installed-flite 30A Pro Switch-Mode BEC Brushless ESC installed Large, easy-access battery compartment Wide-stance tricycle landing gear Nose wheel steering for better ground handling Powerful 3S 3200mAh 20C Li-Po battery included-Po balancing DC charger included Optional E-flite Apprentice S Floats (EFLA550), available Safe Technology Information Needed To Complete Nothing! Everything you need to get flying is included in the box. Overview The E-flite Apprentice S 15e RTF airplane is the most intelligent RC airplane ever offered by Horizon Hobby. At its heart is groundbreaking SAFE (Sensor Assisted Flight Envelope) technology that makes RC flight incredibly easy, even for the least experienced user. Its combination of spatial awareness provides flight envelope protection which adds a degree of security never before available, while its smooth flight capability battles windy conditions so that all you feel is control that's crisp and responsive. Multiple levels of flight envelope protection are provided that can be reduced or removed as your skills progress, yet the "panic" feature is always there to instantly return the model to level flight if you ever lose orientation.