Return to the Paper Neuschwanstein Castle plans here -

Day 2: Well I was waiting for my partner to come home from her teaching a night class and so decided to get ahead with our project. So to a loop of "Life in a Northern Town" by Sugarland, I sat down and sorted out the templates for the servant's quarters #5.
This is the start of a quite complicated piece as there are lots of cut-outs on this piece to fit other buildings into.
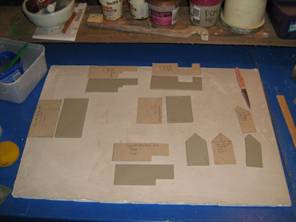
Here are the slabs drying. I have had to leave the template pieces alongside the clay so that I have some idea which piece is which!
While the bits are drying I thought I might share a few tips and tricks that I am using to help me.
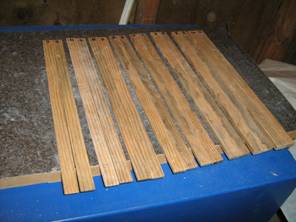
I am but a poor retiree on a fixed income so I don't have the resources to go down the road and buy a slab roller for $500+. So I have been using a pair of sticks the same thickness to roll my slabs out to a consistent thickness.
As you can see above that has changed! I found a nice joiner man and asked him to create for me sticks that were an even thickness and about 500mm long and 50mm wide and thickness from 3mm up to 10 mm. So now I have 8 pairs of guides 3,4,5,6,7,8,9 and 10mm thick. It cost me just a couple of dollars and it has given me a great 'in' to a place that will come in handy if I want to make other wooden bits and bobs. They thought I was a bit strange......
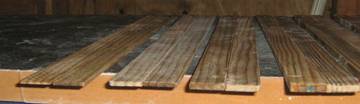
This is a look at the guides end on.
This is going to be a HUGE help in getting precise thicknesses. I have started this project with the towers at 5mm and have moved to 4mm for the buildings. I have it on good authority that I can possible go as thin as 3mm if I am careful but 3mm is very thin and will be quite fragile after it has been fired.
I have wrapped the pieces in plastic for the night to prevent them getting too hard, and will resume in the morning.
Thursday morning !
The rain came pouring down this morning and a client bailed on me so into our project goes me....
Here are some more tips and tricks.
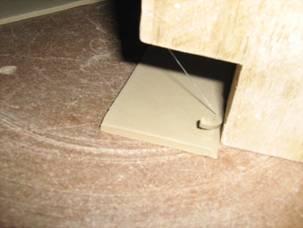
This is my mitre maker!
I use this tool to create nice 45 o angle on my slabs so that they fit together well. Good for 90 o walls and floors. I am going to make another at 60 o for roof and strange angles.
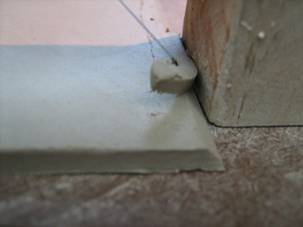
You can see the nice edge that it makes and the curl of extra that it shaves off.
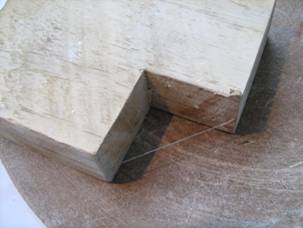
It is simply a block of wood with a square cut out and some fishing line tied across the gap.
The trick is to create a very fine cut in the surface that the nylon goes across so that it is flush with the wood surface at the corner, not too deep or it recesses and creates an odd shape.
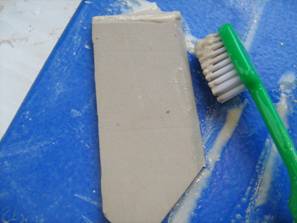
Nope I am not cleaning my teeth here, this is how I get good joins with my slabs. Using a stiff toothbrush creates both the required scoring of the surface but also creates some slurry or glue to stick the pieces together!
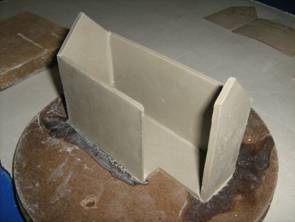
Here is the start of the servant's quarters going together, note the messy bits on the batt, (the round piece of hardboard, usually used when throwing pots on a wheel) this is the slurry being squeezed out when I press the pieces together.
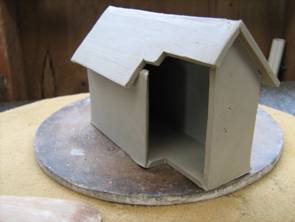
And the roof is now in place.....
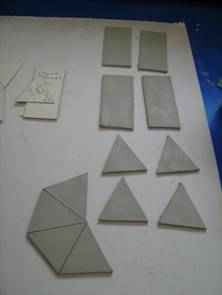
Here are the pieces for the servant's tower.
I am doing two different roofs for this to see which method works better.
At the bottom of the picture is the roof in one piece, scored ready to fold and beside that are the 4 individual pieces that will make up the 2 nd roof.
Having put the folded version together, there were a few issues. The thickness of the clay caused it to crack when folded tightly and I ended up having to put the pieces together individually!
So I will put the individual bits together and see which is the neater!
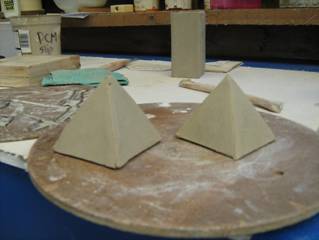
As you may see in the picture, the individual bits went together neater than the folded one so ..... I will not attempt that one again!
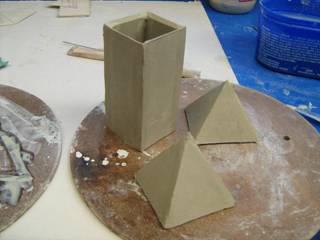
I am happy with the speed that I managed to put this tower together. Now that I know what I am doing, these square buldings go together really quickly!
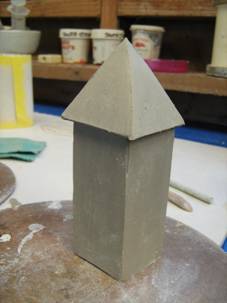
Here is the completed servants tower.
Tried to put it in the hole in the servants quarters but it didnt fit!!!!
Then I remembered the shrinkage involved in working with clay.
Up to 10% shrinkage as it dries!
So the 4 hours between the making the quarters and the tower has allowed the quarters to shrink more.
I am sure that it will fit once they are both bone dry and ready for the kiln.
 The Clay Neuschwanstein Castle Part 3a ( A look at the completed assembly so far) The Clay Neuschwanstein Castle Part 3a ( A look at the completed assembly so far)
Handbuilt Pottery Techniques Revealed: The secrets of handbuilding shown in unique cutaway photography Here are directions for many creative, fun-to-do pottery projects potters can follow to produce handsome finished objects without need of a potter's wheel. The author instructs in coil, slab, mold, and pinch techniques to produce pots, bowls, vases, tiles, and other decorative pieces. She also advises on acquiring basic tools, mixing and preparing clay, and using coloring agents. Newcomers to pottery crafting will especially appreciate her tips for making projects easier to accomplish, such as use of a hairdryer at regular intervals for drying out too-wet clay, and easy methods for keeping clay soft and pliable. Step-by-step color photos with detailed captions guide handcrafters through each project from start to finish. Many photos are of the cutaway type to show correct hand positions for controlling the clay, both inside and outside the form. Here's the book that takes the mystery out of handbuilding in clay, demonstrating each step in the pottery-making process. More than 400 color photos.
|


