HOME

The fast, easy, Tennis ball Trebuchet

This is a tennis ball trebuchet that I whipped up in a couple of hours. The goal of this project was to build a powerful trebuchet quickly and with a minimum of parts. I used just a few different things and a few pieces of 2x4. If you are going to build a tennis ball trebuchet similar to this one, or if you are going to follow these plans I also give you lots of alternatives so you can scrounge up materials. The goal is to make it fast and that it cost nothing. yu can see by the picture that I used two ten pound dumbbells as the counterweight. And they were easily strapped into place with a single hose clamp. This is just the way I did it and you can improvise any number of things including using free weights.

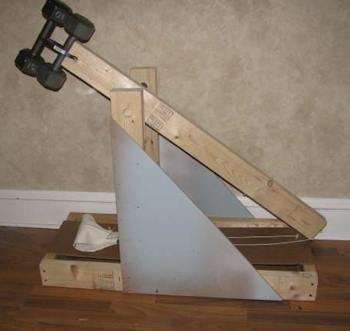
I also have a video showing this trebuchet in action and I go over some of the parts: Make a tennis ball trebuchet video

The heavier the counterweight the better your trebuchet will perform but I would say that 20 pounds is about the limit for this design.
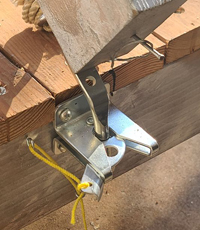
 

The Tennis Ball Trebuchet


What you need to do this project:

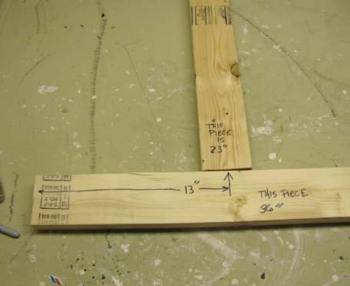
  • 2 2x4's that are 36 inches long and 2 2x4's that are 12 inches long (these form the base)
  • 2 2x4's that are 23 inches long (the uprights)
  • 1 2x4 that is 40 inches long (swing arm)
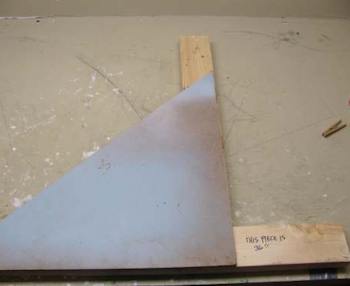
  • 1 piece of 1/4 inch plywood that is approximately 20 inches square. Cut this diagonally to form the two sides. Anywhere from 20-24 inches square is ok.
  • 1 piece of flat wood (plywood or something similar) that is 10-12 inches wide and 36 inches long. This is the platform that the string and pouch rest/slide on.
  • Approximately 5 feet of string
  • A piece of cloth for the pouch that is 10 inches by 6 inches
  • 1 dowel or broomstick or pipe that is about 1 inch thick and at least 15 inches long

Tools

  • Electric drill
  • 1" drill bit
  • Hammer
  • Saw
  • Some nails and screws

Hardware

  • Some screws and nails
  • 4 eyehooks
  • 1 thin and long nail (this is the pouch release nail)


Let's Begin

Layout two of the 2/4's this way

Place as shown

Lay your triangular piece on top of the two by fours as shown and nail it all down securely.

Assemble first side

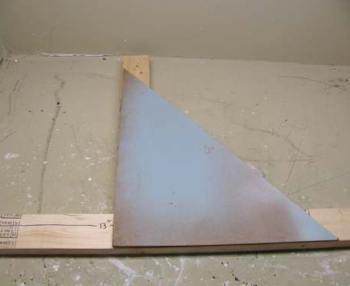
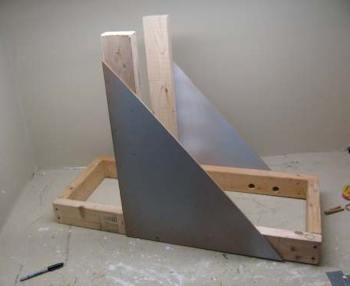
Repeat this procedure again but do a mirror image of this.

assemble other side


Stand these two piece up as shown in the picture below and screw in the two 12 inch pieces as shown. Your trebuchet is half done! I told you this was a fast and easy project!

Assemble the base


Drill two holes about 2 inches from the top so your bar or dowel fits through them as shown.

drill two holes for dowel

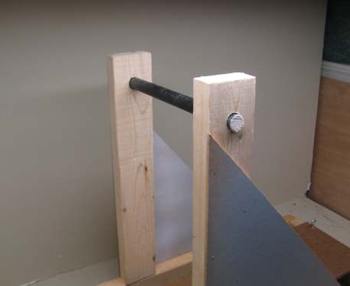
Now screw or nail the baseboard into the trebuchet and screw in two of the eyehooks as shown in the picture below.

2  eyehooks for the trigger


Let's continue on with the build of this tennis ball trebuchet
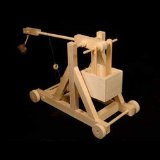
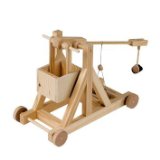
 

Desktop Onager

The Desktop Onager: An Awesome all Wood and Twine War Machine - Fiercely Fend Off Office Rivals -- Conveniently sized to sit on your desk, this intimidating little machine is an actual working reproduction of an onager. -- The weapon is all wood and twine with no metal parts, but it packs a big punch. Load it up with the included wooden balls or get creative with marshmallows, coffee creamers, erasers and more to see how many cubicles they can soar above before landing. -- Properly constructed, the onager has a range from 10 to 20 feet. The ancients were able to use nothing but wood and ropes to build machines that could hurl heavy stones great distances, now you can do the same to enforce peace in your office or dorm room. -- Build it yourself in under three hours, because this kit includes everything you need except for glue and a few simple tools like scissors, sandpaper, and a file. Colors may vary. -- Warning: This is a representative model of a real ancient military weapon. Use only with competent adult supervision.


Desktop Trebuchet Desktop Trebuchet Defend your desktop! The mere presence of this striking machine on your desk will induce fear and respect among your peers. Take charge and besiege your opponents with a fully functional, genuine trebuchet for your desk! It really works! It takes about two to four hours to assemble, which is a joy in itself with the hand selected wood and computer-controlled, precision cut parts. The professionally designed kit and fully detailed instructions - 10 pages of descriptions and tips, with of photos of every step - makes assembly a breeze. All you really need is some glue and a pair of scissors. For a more refined look, a little sandpaper and a small, round file would be helpful, but are entirely optional. Performance! This mighty desktop artillery is capable of hurling the wooden ball projectiles (included) over twenty feet! Just load-up the counterweight bucket with about 150 pennies and you are ready to go!


Miniature Trebuchet

The Miniature Trebuchet - The trebuchet was the ultimate artillery weapon of the medieval period and early renaissance. A large and unwieldy weapon, it was typically built on-site during battle, and tuned to lob great weights - such as the carcasses of rotting horses and pots of burning pitch, over the castle walls and onto its inhabitants. This is our newest and smallest trebuchet design in a long line of catapult kits. Designed by master trebuchet expert Ron Toms, this machine is ideal for the student on a budget or as a wonderful display piece for any desktop or bookshelf of any history enthusiast. Precision carved by computer controlled machinery for guaranteed fit and accurate joinery. The detailed instructions include loads of photos of each step of the construction process, tuning tips and safety notes. Included in the kit are four wooden projectiles, all the necessary components for the sling, trigger, and counterweight bucket as well as all the parts for the kit. The only thing you'll need to supply are 64 pennies for counterweight and a few simple tools - Scissors, a ruler, a utility knife, wood glue and a few rubber bands to hold the pieces together while the glue dries. Tools required: Scissors, Glue, Ruler, rubber bands and a utility knife. Sandpaper is optional. Additional Counterweight Required: 64 pennies. Range: About 10 feet.

Science experiment Catapult KitScience Project Experiment Catapult Kit (S.P.E.C.K.)

The Ultimate Science Project Experimenter's Catapult Kit! It's fully adjustable, multi-configurable and repeatable. It's a perfect model for learning the scientific method! All in all, there are more than 400 different configurations and tuning options possible with this kit. Suitable for hundreds of experiments and learning opportunities. The completed frame is 14.5 inches long, 7 inches wide and 11 inches tall. The arm measures 20.25 inches long with multiple axle and power attachment points. This machine can hurl projectiles up to 40 feet, depending on configuration, tuning, and lots of other variables! What you can learn: This kit provides a real world, hands on example of many aspects of basic physics. It exposes the student to concepts of mechanical advantage, levers, gravity and energy, to name a few. It can demonstrate the storage and conversion of potential energy to kinetic energy through levers, and it is equipped with optional wheels, to demonstrate conservation of momentum. All in all, the concepts of efficiency, power and work can be demonstrated and applied. This kit is useful for teaching engineering, science, design of experiments, problem solving and cause-effect relationships. It was designed to get students to think about physics in a real world, tangible context. Theories can be made and tested; this process, and analyzing why the observed results occur can ultimately lead to other, more advanced concepts in physics, mechanics and mathematics. Analyzing the data can make use of statistical methods from basic averages to much more advanced topics if desired. With 18 pages of instructions including assembly of every basic configuration, suggested experiments, tuning guidelines, independent and dependent variables to record and measure, data tables, historical information about trebuchets and catapults, and more, it should be easy to get started with this Ultimate Science Project Kit!


This is a Storm The Castle Project


Table of Contents for the Trebuchet Making tutorial

  1. Trebuchet Home Page
  2. Materials/Tools
  3. Assemble the sides
  4. Assemble the base
  5. Make and attach the swing arm and counterweight
  6. The stringpouch and the runway
  7. Finish and fire it!
  8. Trebuchet video (quicktime MOV)
  9. Books/Buy
  10. Free Trebuchet Plan
  11. Trebuchet blueprints
  12. Books/Medieval store

Check out My Store: Siege Engines you can buy at amazon.com

More Trebuchet Stuff

Catapults!

  1. Popsicle Stick Trebuchet
  2. Office Supply Trebuchet
  3. The Little Dragon Trebuchet - Build this table top sized trebuchet
  4. The Tennis Ball Trebuchet
  5. The Bicycle Wheel Trebuchet - This one is bigger and a bit more serious
  6. Koji's Trebuchet Improvements
  7. John H. Trebuchet and Research improvements
  8. Adil's Mini Trebuchet
  9. Gabe's Ferrari of Trebuchets
  10. Trebuchet Videos
  11. Tips on Improving your Trebuchet
  12. Trebuchet Kits
  13. Trebuchet Physics
  14. A Trebuchet Model
  15. Trebuchet Blueprints


OTHER PROJECTS


SUBJECTS

WEBSITES

Stormthecastle.com
Castlefiction.com
Epic Fantasy.com
The Medieval Armory
THe Fantasy Guide

The Heroic Dreams Blog
The Telescope Nerd.com


MY STORES

Dioramas & miniatures
Classical Guitar store
Telescope Store

Terrarium Store
Fantasy Art Books
Model Rocket Store
Siege Engine Store
R/C Airplanes Store
Swords


MORE

Links
Banner Exchange


---------
All Materials, unless otherwise stated are Copyright©
Kalif Publishing and StormtheCastle.com check out my copyright page for information about how to use any work on this site.

If you have questions
or would like to
contribute you can

---------

Earning money with your website-