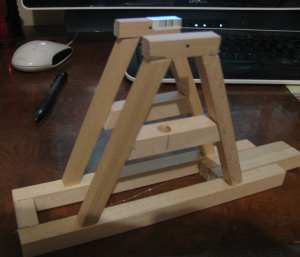
 Now glue the uprights to the base. The uprights should be centered on the base. Now glue the uprights to the base. The uprights should be centered on the base.
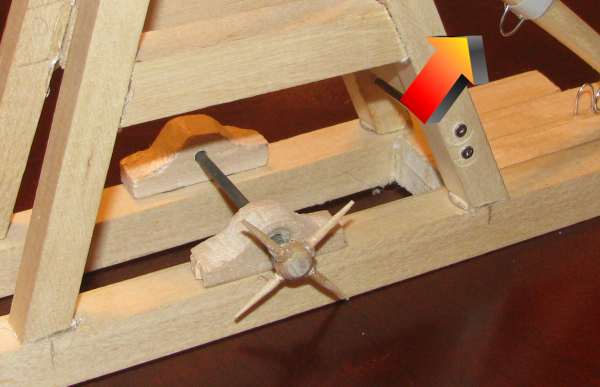
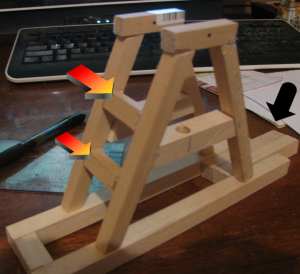 Now cut and glue in two end pieces. These are shown by the red/yellow arrows. And put these end pieces opposite the slide side of the trebuchet. This slide side is shown by the black arrow. Now cut and glue in two end pieces. These are shown by the red/yellow arrows. And put these end pieces opposite the slide side of the trebuchet. This slide side is shown by the black arrow.
Addendum: Note this carefully. The two red/yellow arrows show two horizontal pieces you put in. Only put the top one in! The bottom one gets in the way of the couterweght swinging.
So, only put the top one in.
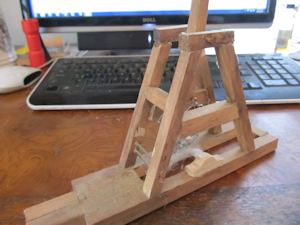
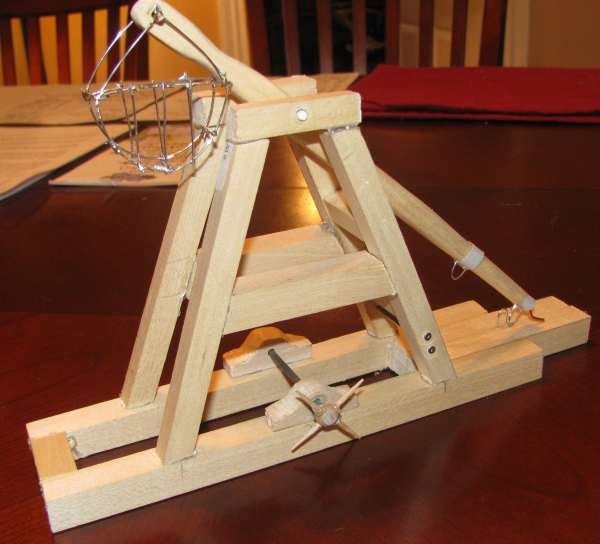
This picture shows the trebuchet after it is complete and you can see that the lower horizontal bar is removed.
Now let's work on the swing arm of this trebuchet. I used a piece of wood and I carved it a bit. The overall length is eight inches.
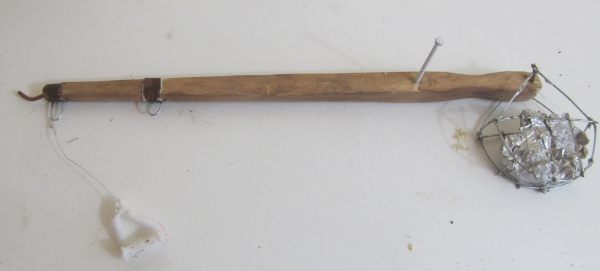
Here are some dimensions to help you make this:
The pin for the counterweight basket is close to the very end.
The nail for the pivot of the whole thing is 2 inches from the right end. This measurement is important. Where this pivot pin sits has an effect on how effective the treb is.
The silver wire that forms a hoop to hold the string is on the very left end and the other hoop is 1 3/4 inches from the end. That hoop is what locks down and releases the trebuchet.
On the very end you see a copper wire that forms a curved kind of shape. That is the release. I used a small piece of copper wire for that.
This picture gives you a better look at that release pin and the hoop that holds the string for the pouch.
This picture shows the pivot pin and a little bit of the basket. The pin is just a nail that I used. The hole should be just a little bit larger so the nail pivots freely.
 The counterweight basket is a bit more difficult to describe but I just put it together with wire and filled it with melted metal. You can improvise just about anything and pennies will work well as the counterweight. Put as many as you can fit while still allowing the swing arm to swing freely. I Made this setup because I was copying the actual Saladin trebuchet. The counterweight basket is a bit more difficult to describe but I just put it together with wire and filled it with melted metal. You can improvise just about anything and pennies will work well as the counterweight. Put as many as you can fit while still allowing the swing arm to swing freely. I Made this setup because I was copying the actual Saladin trebuchet.
The important thing here is that it rotate freely. Make the hole large enough for your little pin to move freely. It can even be loose.
Now let's take a close look at the pouch. this is the most important part of the whole thing. The pouch is a little piece of cloth that acts as a sling to hold the projectile. It has two pieces of string on it. These pieces are each about two inches long. One string is tied in a knot to the metal loop. The other string goes to a little circle that I made out of paper clip. (drawn in red) This paper clip ciircle is just placed on the copper arm when the sling is loaded and the treb is ready to fire. The circle will just slide right off the hook when the treb is fired
This following picture shows how the swing arm is mounted to the rest of the trebuchet.
 And this picture shows you how to put a hoop in the base of the treb as a locking mechanism. The two hoops meet up like shown so you can put a pin or nail through them to hold the treb in the locked and ready to fire position. You pull the pin and it fires. And this picture shows you how to put a hoop in the base of the treb as a locking mechanism. The two hoops meet up like shown so you can put a pin or nail through them to hold the treb in the locked and ready to fire position. You pull the pin and it fires.
Ok, lets take a look at the crank mechanism. The axle is a nail. I carved some wood and the handle is made out of toothpicks. This crank will have a string going from it to the hoop shown with the arrow. It should connect by an open hook so you can wind it down, lock the treb down and disconnect the string before firing.
And you can see the heads of two nails in the upright of the trebuchet (just under the red arrow). I put those in there as a guide for the string.
 Okay, lets' see how this trebuchet is loaded and fired Okay, lets' see how this trebuchet is loaded and fired
  Desktop Trebuchet Defend your desktop! The mere presence of this striking machine on your desk will induce fear and respect among your peers. Take charge and besiege your opponents with a fully functional, genuine trebuchet for your desk! It really works! It takes about two to four hours to assemble, which is a joy in itself with the hand selected wood and computer-controlled, precision cut parts. The professionally designed kit and fully detailed instructions - 10 pages of descriptions and tips, with of photos of every step - makes assembly a breeze. All you really need is some glue and a pair of scissors. For a more refined look, a little sandpaper and a small, round file would be helpful, but are entirely optional. Performance! This mighty desktop artillery is capable of hurling the wooden ball projectiles (included) over twenty feet! Just load-up the counterweight bucket with about 150 pennies and you are ready to go! Desktop Trebuchet Defend your desktop! The mere presence of this striking machine on your desk will induce fear and respect among your peers. Take charge and besiege your opponents with a fully functional, genuine trebuchet for your desk! It really works! It takes about two to four hours to assemble, which is a joy in itself with the hand selected wood and computer-controlled, precision cut parts. The professionally designed kit and fully detailed instructions - 10 pages of descriptions and tips, with of photos of every step - makes assembly a breeze. All you really need is some glue and a pair of scissors. For a more refined look, a little sandpaper and a small, round file would be helpful, but are entirely optional. Performance! This mighty desktop artillery is capable of hurling the wooden ball projectiles (included) over twenty feet! Just load-up the counterweight bucket with about 150 pennies and you are ready to go!
The Miniature Trebuchet - The trebuchet was the ultimate artillery weapon of the medieval period and early renaissance. A large and unwieldy weapon, it was typically built on-site during battle, and tuned to lob great weights - such as the carcasses of rotting horses and pots of burning pitch, over the castle walls and onto its inhabitants. This is our newest and smallest trebuchet design in a long line of catapult kits. Designed by master trebuchet expert Ron Toms, this machine is ideal for the student on a budget or as a wonderful display piece for any desktop or bookshelf of any history enthusiast. Precision carved by computer controlled machinery for guaranteed fit and accurate joinery. The detailed instructions include loads of photos of each step of the construction process, tuning tips and safety notes. Included in the kit are four wooden projectiles, all the necessary components for the sling, trigger, and counterweight bucket as well as all the parts for the kit. The only thing you'll need to supply are 64 pennies for counterweight and a few simple tools - Scissors, a ruler, a utility knife, wood glue and a few rubber bands to hold the pieces together while the glue dries. Tools required: Scissors, Glue, Ruler, rubber bands and a utility knife. Sandpaper is optional. Additional Counterweight Required: 64 pennies. Range: About 10 feet.
|


