Hi, Thanks for visiting my website. My name is Will and if you have questions
or would like to
contribute projects or ideas you can contact me
How to Make an Origami Iris (flower)
This is a bit of a challenging fold but beginners can do it. Just take your time and follow through the instructions. I used paper that I purchased in Japan but you can use just about any paper including printer paper. Just cut yourself a square of paper almost any size from four inches square to eight inches square. This project was submitted to the website by (Hamza Sardar) My thanks to him for this terrific tutorial. You can see his other tutorial here: How to make an origami crane
I have more Origami Projects, and I have a lot more coming. I have an Origami Home Page here so you can view the projects. On that Page I also have resources to buying books and paper and I have information and projects on the Japanese art of Tatebanko which is the art of paper dioramas. I also have a page of Origami Books and Papers.
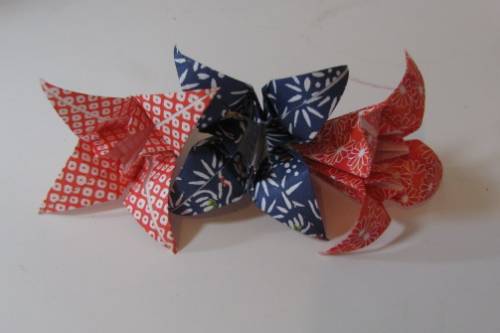
The picture below shows three that I made. This tutorial just shows you how to make the actual iris flower. You could easily add a stem by rolling up a piece of paper.
I also have a video showing you how to make this flower.
This is a popular origami fold, and is a good starting point for anyone looking to develop their skills from beginner, to intermediate/lower intermediate.
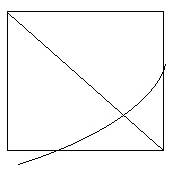
Step 1: First step is to fold in fold in half diagonally.
Step 2: Then fold in half along the straight line.
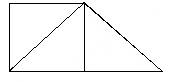
Step 3: Lift up the flap on the right, and squash it down into a square.
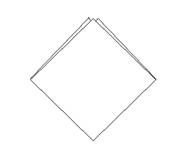
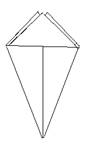
Step 4: repeat on the back. This is a very well known base, and it is called a preliminary base.
Now that we have the preliminary base made we can make the Iris.
Step 5: flip it over.
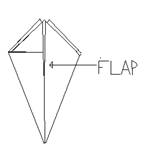
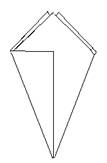
Step 3: Note how if you look at the side of the model, there are 2 flaps, so there are 4 flaps in total. This is IMPORTANT. Remember this. Take one of the side flaps, and fold it inwards, so it lines up with the center.
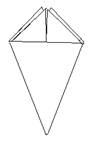
Step 4: repeat on the other side, and on the back. This is what you should have:
Step 5: a slightly tricky part. Hold the right flap pull it up like this:
Step 6: And then put your finger inside it, and squash it down (straighten it afterwards) like this:
(If you can do this, you can finish the whole thing.)
Step 7: Repeat on the back.
Step 8: Now, take the first flap on the lift, and turn it over to the right. Repeat on the back and ...
this is what you should have:
Step 9: Now do step 5-6 on the front and back again Except this time the flaps are on the left.
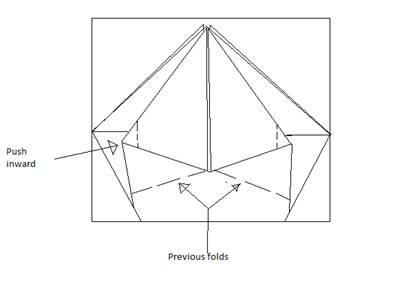
Step 10: Now fold the 2 sides into the center, and unfold on all flaps.
Step 11: The hard part. Put your finger on the flap at the top, and pull up. As the folds are already in place (step 9 & 10) with one finger keeping the flap up, use the other hand to squash in both sides:
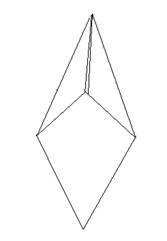
Step 12: fold the new triangular flap up.
Step 13: repeat on all 4 flaps.
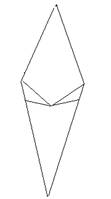
Step 14: Fold the top flap over from the right to the left on the front and back. Now turn it so you get a side view, and notice you can see 4 flaps now. Divide that four into 2 ( 2 flaps in each hand) and fold them to either side, and repeat on the back. This is how to see all four flaps. Now you should have this.
Step 15: Fold both of the sides to the center, on all four flaps. This is what it should look like.
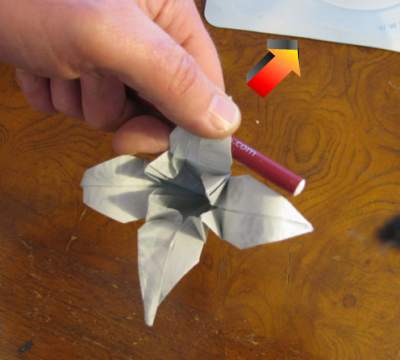
Final step: Take these four flaps, and roll them down to create petals. Thanks for taking the time to view this. You can also use the edge of scissors or a knife to curl the petals. This is a nice little touch
You can curl the petals by squeezing a petal between your thumb and a pencil and moving in the direction shown by the arrow. Do multiple strokes while gently squeezing and the petal will curl more and more.
Yuzen washi is cut to the size of "origami" folding paper so you can enjoy it in everyday scenes. Sets of yuzen washi are on sale with wide-ranging colors, mostly shining, including bright yellow colors like goad.
All pieces are finished nicely, retaining original texture and warmth that cannot be imitated by any printer.
Actual colors may differ from designed colors posted on the website because each piece is cut from large-size paper. Take those images as samples.
The paper is cut with the utmost care. Any piece may be found with misalignment of about 1 millimeter due to the nature of Japanese-style paper. Yuzen washi used in this product is thicker and stronger than ordinary paper.
Origami Flowers is a truly original book that combines innovative paper crafting with the beauty of flowers. Both children and adults will enjoy this gorgeous new book full of dozens of easy-to-create flowers. Readers will learn how to turn ordinary square origami paper into dazzling azaleas, glorious roses, cheerful hyacinths, exquisite lilies and much more. Origami Flowers also explains how to make bouquets, fancy potted flowers and ikebana, as well as how to add stems and leaves to each creation to make them more realistic than ever.
Do you like making projects and exploring a variety of hobbies?
Sign up for my free newsletter. I give you regular updates on hobbies and projects you can make. it is totally free and I don't share your email with anybody.


 This is a popular origami fold, and is a good starting point for anyone looking to develop their skills from beginner, to intermediate/lower intermediate.
 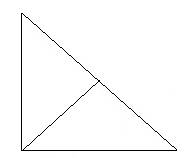 Step 2: Then fold in half along the straight line.
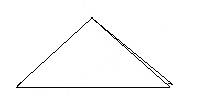

 Now that we have the preliminary base made we can make the Iris.
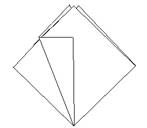
 Step 6: And then put your finger inside it, and squash it down (straighten it afterwards) like this:
 Step 8: Now, take the first flap on the lift, and turn it over to the right. Repeat on the back and ...
 Step 11: The hard part. Put your finger on the flap at the top, and pull up. As the folds are already in place (step 9 & 10) with one finger keeping the flap up, use the other hand to squash in both sides:
 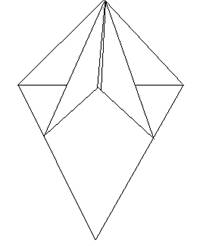 Step 12: fold the new triangular flap up.