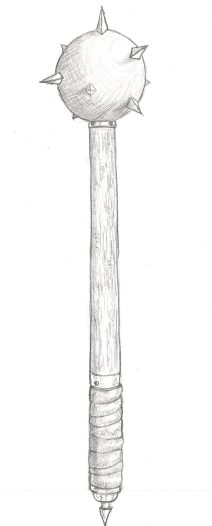
Step one: Always begin your drawing by lightly penciling in the general shape of the object you are drawing. This one is pretty easy you just draw a ball then a long cylinder extending from it. Note how the ball is nice and round and the cylinder (handle of the mace) is just a little bit thicker at the bottom end . This slight thickening toward the bottom will make it look much more real.
Step Two: Now draw in the defined details only as shapes - don't do any shading yet. I drew the straps at the bottom end (this is where our knight would grab it. I also drew three distinct metal bands: one just under the ball, one at the top of the strap section and a third at the very bottom. Think of these metal bands as the things a blacksmith put on to keep everything together. Finally, draw in the points on the ball and the point on the very bottom.
Step Three: Now lets do the detail work. The nice thing about this project is that you get to do a lot of different types of textures. And beore you start drawing your textures just take a good look at my mace with an eye toward the light and dark areas. See how the left side of the handle is darker and the bottom left area of the mace head is darker? This shows the light very well on the whole object and makes it look more real. As you draw your textures keep this in mind.
- Draw the leather/cloth handle: Notice how the wrappings seem to bulge a little bit. You achieve this effect by bulging the outlines and by your shading. There are small areas of white on each wrap - these are the highest points of each bulge.
- Draw the three metal caps (under mace head, just above leather handle, and at bottom: These remain almost totally white so they look like shiny metal. I just drew a few lines in them as if reflections. Think of these as being brassy.
- Draw the wooden handle: This is wood so you should make long grainy lines in it. take a look at a piece of unpainted wood to get a sense for what wood grain looks like. Just like in the leather section the left side of the wood handle is darker because it is shadowed. This doesn't show up real well in my scanned image you see but it shows up great in the original drawing. Just like all the other parts there is a light area that goes right down the middle of the handle. This shows the roundness of the handle ( see the closeup below)
- Finally you should draw the actual mace ball.This is a bit tricky but take your time. Notice how the ball has a nice shaded area almost like a crescent moon? You might want to draw this crescent line first then shade in the whole lower left area. Also, the points on the mace head cast a shadow on the mace ball - don't forget about that! They make for a very nice detail.

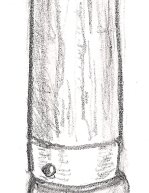
This closeup of the mace handle shows a couple of important points. See how it is darkest on the left? This is the shadowed side of the handle. The normal wood grain is along the right and the lightest area runs right down the middle. This is the highlight where the light is strongest. This distribution of light and dark will give the handel a nice three dimensional feel.
Also notice the brass cap with the rivet in it. This metal section has very little line inside it -this makes it look shiny.
 Continue on to the next lesson: How to draw a Knight's Chainmail Continue on to the next lesson: How to draw a Knight's Chainmail

Drawing and Painting Fantasy Landscapes and Cityscapes
Artists interested in graphic novels and comic book illustration will find all the guidance and inspiration they need to draw and paint landscapes that evoke myths and legends, lost empires, futuristic planets, dramatic dreamscapes, underwater worlds, and subterranean cities. Easy-to-follow instructions and step-by-step illustrations demonstrate techniques for rendering a wide range of fantasy features, whether working in ink, watercolor, or computer pixels. Details covered in this heavily illustrated volume include -- choice of materials, with advice on getting the most from software programs . . . basics of perspective, architectural geometry, color, mood, and seasonal variations . . . landscape features, including skies, clouds, mountains, caves, deserts, snow, and water reflections . . . imagined landscapes from ancient cultures, future worlds, alien planets, undersea worlds, and surreal dreamscapes . . . cityscapes, from medieval towns to the metropolis of the future . . . famous fantasy worlds, from Atlantis to Middle Earth. This good-looking and instructive volume features a gallery of fantasy and science fiction images among its more than 200 color illustrations.

Do you like making projects and exploring a variety of hobbies?
Sign up for my free newsletter. I give you regular updates on hobbies and projects you can make. it is totally free and I don't share your email with anybody.
|
![]()


