
![]()
I have a youtube channel with over 1000 Videos!
![]()

![]()

Catapults You can Make
- Catapult Home
- Table Top Troll Catapult
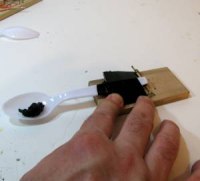
- MouseTrap Catapult
- Mangonel Torsion Catapult
- Backyard Ogre
- Popsicle Stick Catapult
- Wyvern Torsion Catapult
- Goblin Catapult
- The MultiPult - 5 shot
- DaVinci's Catapult
- Cardboard Catapult
- Make a Ballista
- The Underpult
- Popsicle Stick Ballista
- Popsicle Stick Onager
- Office Supply Catapult
- Sideways Catapult
More Catapult Stuff
- Free Catapult Plan
- Make a Catapult Game
- Catapult FAQ
- The History of the Catapult
- Catapult Timeline
- How does a catapult work?
- Catapult videos
- Catapult Kits
- Siege Engine Store
- Medieval warfare & documentaries
- Send me your catapult Pictures
- Catapult and Siege Engine Books
- Catapult Articles
My other Subjects
- Beekeeping
- Blacksmithing
- Bonsai
- Classical Guitar
- Dioramas
- Fantasy Art School
- Goldfish
- Leathercrafting
- Military Dioramas
- Make Video Games
- Mead Making
- Miniatures
- Model Rockets
- Nature projects
- Obsessions
- Origami
- Paper Making
- Paper Games
- Paper Projects
- RC Airplanes
- Rocket Launchers
- Science Projects
- Stained Glass
- Stamp Collecting
- Stop Motion Animation
- Sword Making
- Tatebanko
- Telescopes/Astronomy
- Terrariums
- Trebuchets
More Stuff
- Adventures/Travel
- The Creativity of it
- DragonSlayer
- Send Me your pics
- Products/Tools
- My Medieval Blog
- Medieval Website
- Medieval Projects
- Medieval Castles
- Telescope Nerd
- Press/Media kit
- Contribute a tutorial to my Website

- Support Will with Patreon or PayPal

Hi, Thanks for visiting my website. My name is Will and if you have questions
or would like to
contribute projects or ideas you can contact me